Sunday, December 20, 2009

AM/FM/GIS

Automated Mapping/Facilities Management Systems seem to have been GIS's older cousin, developed to spatially display and manage attribute information of associated with an infrastructure network (electricity, gas, sewers, etc.).  This type of software is composed of a graphics engine for rendering spatial information combined with a relational database management component.  An example software title is the GE Energy Smallworld suite.

There's a decent history and evolution in this 2003 ESRI white paper:
Utility GIS-More Than Just AM/FM

Also see AM/FM/GIS on Wikipedia

Saturday, December 19, 2009

Quick Zoom Tools


Download the icons & code package:
Custom Zoom Tools.zip

The Bookmarks feature in ArcMap is great for navigating to a saved view, composed of a specific location and scale in a mapping project, however I'm working on a project where I want to zoom to a predefined map scale (1:5,000, 1:30,000, or 1:100,000), but I do not want to change the location.  In this case, Bookmarks are not the answer, so I built three buttons that change the Map Scale with a single click.

Having this single click option saves up to a couple seconds of looking for an appropriate scale each time a button is used instead of scrolling, switching to the Zoom In/Out tools, or typing a scale unit manually.  It would be much faster (especially over the time span of an editing project) to use "map scale bookmarks" to automatically zoom to a predefined level.

Three specific scales are chosen to represent three general views:
  • 1:5,000 is a decent large-scale to use for detailed neighborhood-level observations and to zoom in close enough to get a good look at braided stream segments
  • 1:30,000 is an effective medium-scale to use for viewing larger areas, while the user is still able to distinguish smaller anomalies in a coverage or in imagery
  • 1:100,000 offers a much larger visible area.  For projects that stretch over wide areas, this map scale offers a quick step back to pan across the city/county, etc.
Remember, in cartography "large-scale" refers to larger quotients which are less than, but approach the one.  So as the denominator decreases, scale increases:
  • 1:5,000 = "One-to-five thousand" = 1/5,000 = "One divided by five thousand" = 0.0002
  • Similarily, 1:30,000 = 0.00003
  • 0.0002 > 0.00003, thus 1:5,000 is a larger scale than 1:30,000
  • Further, 1:1 = 1.0, and 1:2 = 0.5, thus 1:1: is larger than 1:2

Installation:
  • Download and unzip the installation package, containing three bitmap icons, and a text file containing the code: Custom Zoom Tools.zip
  • Move the three bitmap files to C:\Program Files\ArcGIS\Bin\Icons or C:\arcgis\Bin\Icons (depending on your installation)
  • Open the text file Custom Zoom Tools Code.txt. Select All and Copy the text.
  • Open ArcMap and load either a saved project or a blank document
  • From the Tools menu, choose Customize.  
  • Navigate to the bottom of the Categories list and select
    [ UIControls ]
  • Make sure that the Save In menu at the bottom left of the Customize dialog is set to Normal.mxt
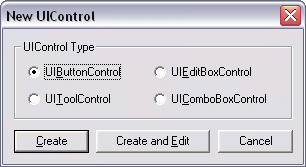
  • Press the New UIControl button and Create a UIButtonControl.  Repeat this two more times so the Commands list has three new UIButtonControls

    • Slow double click on each of the new button controls in the Commands list to rename them Zoom5k, Zoom10k, and Zoom100k.  The names will automatically change to Normal.Zoom5k, etc. when finished.  The names of these are important and must match exactally to work with the code.
    • Drag these three new button controls onto a desired toolbar (I put mine next to the Map Scale box)
    • With the Customize dialog still open, right click on each button and navigate to Change Button Image :: Browse.  Choose the appropriate icon ("_Zoom5k" etc.) for each button
    • Close the Customize dialog
    Now just paste the code in the correct spot to finish:
    • Open the Visual Basic Editor by pressing Alt + F11, or by navigating to Tools :: Macros :: Visual Basic Editor
    • In the Project Explorer pane, expand "Normal (Normal.mxt)," and "ArcMap Objects" and double click on ThisDocument.

    • A window will open named "Normal.mxt - ThisDocument (Code)."   Scroll to the bottom of this text, add a few lines by hitting enter a few times, and paste all of the code from the text file included in the download above
    • Save this document of code, close the Visual Basic Editor and test the buttons.

    The Code:
    In the following example a few elements are prepared to change the map scale, the map scale is set to 1:5000 (pMap.MapScale = 5000), and the map is refreshed so the new map scale will be visible to the user:

    Private Sub Zoom5k_Click()
    'Change the scale of the current view to 1:5,000

    Dim pMxDocument As IMxDocument
    Dim pMaps As IMaps
    Dim
    pMap As IMap 
    Set pMxDocument = ThisDocument
    Set pMaps = pMxDocument.Maps
    Set pMap = pMxDocument.FocusMap
    pMap.DistanceUnits = esriUnits.esriInches

    pMap.MapScale = 5000

    pMxDocument.ActiveView.Refresh 

    End Sub

    Wednesday, November 18, 2009

    Angular Unit Conversion - DD, DMS, Radians

    It's important to know how to convert back and forth between various units of angular measurement.

    Degrees, Minutes, Seconds to Decimal Degrees (DMS to DD):

    DD = Degrees + (Minutes/60) + (Seconds/3600)

    If you put this in terms of a clock, where a degree equals one hour of time (and there are 360 hours in a complete cycle of a day), it becomes easier to understand how minutes and seconds work in relation to the degree. There are sixty minutes in an hour (or one degree), and also there are sixty seconds in a minute. Thus, 60 seconds times 60 minutes equals 3600 seconds in an hour (or in one degree of angular measurement). Now just add these together.


    Note: When working with locations west of the prime meridian, longitude values may be represented with negative numbers (-84° in this case). The formula should use subtractions (-) instead of addition (+) (line 3), or the entire formula must be multiplied by -1 as a final step (line 4).  Note the "abs()" function which temporarily converts the negative value to a positive number so the addition signs can be used.  In short, be extra aware of your data and the formulas used to convert between these units.

    Decimal Degrees to Degrees, Minutes, Seconds (DD to DMS):
    This conversion is a bit more tricky because the minutes and seconds are combined and packed into the decimal.

    For the DD value 30.443452º
    • Anything to the left of the decimal is the full degree value
      D = 30º
    • Multiply the decimal value by 60 to find the minutes. The value will be between zero and 59.999. The minutes value will be what is in front of the decimal again.
      M = 26' because 0.443452 * 60 = 26.60712
    • Multiply the minutes decimal value by 60 to find the decimal seconds value. Again, it will be between zero and 59.999, as there are 60 seconds in a minute. Decimal seconds are acceptable.
    • S = 36.4272" = 60 * 0.60712
    To pull this off in a spreadsheet, create an intermediate "Calculate Minutes" field, which is referenced to build the Minutes and Seconds fields. Negative numbers require an additional step (see below).


    Negative numbers will have a leading third character to deal with in front of the decimal. First, sort the dataset so these can be dealt with as a group. Change Degrees formula from =left(*Cell*, 2) to =left(*Cell*, 3) for all negative values. That's it.


    DD to Radians to DD:

    Radians are another unit of angular measurement, used most often in all but basic applications of geometry. So what is a radian?  It's the arc distance between two points on a circle where an angle intersects, equal to the circle's radius (Wikipedia). It's the unit of measure used to calculate a number of Excel formulas, so it's important to understand what it means, and at the very least how to use it.


    DD to radians:


    Or radians to DD:


    Friday, November 13, 2009

    System Shut Down Utility


    This is a very light utility that I coded in just a few hours. It's purpose is to shut down the computer after a selected amount of time from the combo boxes (between 5 minutes to over 6 hours). The simple .exe illustrates a few basic but useful VB techniques:
    • Setting up combo boxes & values
    • Global variables
    • A timer
    • Time / Date / Now functions
    • Call functions from other subroutines
    • and the main feature, automatically shut down the computer
    Instructions:
    • Download and unzip the package. Rename if necessary (see Final Tricks, below)
    • Open the program. The current date and time will display
    • Choose an amount of time from the Hours, and Minutes menus
    • Click "Commit" when ready. You will be prompted to verify (Yes or No) that you are ready to begin, choose Yes to continue
    • The time will be updated to report when the count began, and the remaining time (in minutes) will update every 60 seconds. When the time expires, the computer will automatically shut down. That's all there is to it!
    Here are the guts of it:

    Combo Boxes:
    First, the contents of the pull down / combo boxes are set up in the Form_Load() subroutine, thus the contents of each menu are loaded when the app starts. Here's the code for the minutes list:

    Private Sub Form_Load()
    cboMins.AddItem ""
    cboMins.ItemData(cboMins.NewIndex) = 0
    cboMins.AddItem "5"
    cboMins.ItemData(cboMins.NewIndex) = 5
    cboMins.AddItem "15"
    cboMins.ItemData(cboMins.NewIndex) = 15
    cboMins.AddItem "30"
    cboMins.ItemData(cboMins.NewIndex) = 30
    cboMins.AddItem "45"
    cboMins.ItemData(cboMins.NewIndex) = 45
    '...
    End Sub

    Global Variables:
    When the command button is clicked to run the program, the values from each of the combo boxes are passed to the intHours/intMinutes variables which have been dimensioned in the General Declarations (the topmost portion of the code editor). These can be called by various other functions to verify that a time has been selected (intHours + intMinutes > 0?), or to set the iterations of the timer, etc.

    Option Explicit
    Dim intHours As Integer
    Dim intMinutes As Integer
    _____________________________

    Private Sub Form_Load()
    '...

    The VB Timer, Shutdown, & Calling Subroutines:
    Timers can be a little tricky in this situation, but they're basically simple. There are two main properties: Enabled (on/off), and Interval (how long the timer runs). It would be great to set the timer to run for 4 hours and 5 minutes, but that's not how it works. The timer runs for a given number of milliseconds (1,000 milliseconds = 1 second) between 0 and 65,535 (just over 1 minute, 5 seconds). Instead we'll make a variable that will represent the total number of desired minutes, and loop through ever second (tmrShutDown.Interval = 60000) until the counter = 0; then run the desired procedure.

    First, add a Timer control (Visual Basic 6) to the form named tmrShutDown. In Form_Load(), set the timer's Interval to 60000 (one minute) and make sure the timer is off as the app loads.

    Private Sub Form_Load()
    tmrShutDown.Enabled = False
    tmrShutDown.Interval = 60000
    '...
    End Sub

    Before the timer is enabled (via the command button), set a predefined global variable (intTime) to equal the amount of desired time in minutes. Now tell the timer to start running. Now when the timer is enabled, some code will run inside the timer's subroutine every 60 seconds (or 60,000 milliseconds); essentially as a loop. This will reiterate every 60 seconds until it is told to stop (tmrControl.Enabled = False). Insert a simple if-then statement: If the time counter (intTime) = zero, stop the timer and call the procedure to turn off the computer, otherwise, subtract one from the counter and continue.

    Option Explicit
    Dim intHours As Integer
    Dim intMinutes As Integer
    Dim intTime As Integer
    ___________________________________________

    Private Sub cmdCommit_Click()
    '...
    intTime = (intHours * 60) + intMinutes
    tmrShutDown.Enabled = True
    '...
    End Sub
    ___________________________________________

    Private Sub tmrCommand_Timer()

    If intTime = 0 Then
    tmrCommand.Enabled = False 'Turn off timer
    Call ShutDown
    Else
    intTime = intTime - 1
    End If End Sub
    ___________________________________________

    Private Sub ShutDown()
    Shell "shutdown -s -f -t 00"
    '...
    End Sub


    Final Tricks:


    You might notice the odd title. Combined that with a similar inconspicuous file name alteration, and the app can go quite unnoticed on a computer - which might be useful to certain users.

    Clicking the command button disables itself and both combo boxes to let the user know that it is working.

    Finally, two labels are updated to include a time that the timer started, and how much time is left before shutdown. This should be updated in the timer's subroutine.

    Private Sub cmdCommit_Click()
    '...
    cboHours.Enabled = False
    cboMinutes.Enabled =
    False
    cmdCommit.Enabled = False

    lblInitial.Caption = "Initial Time: " & Now
    lblTimeLeft.Caption = "Time Remaining: " & intTime

    End Sub

    Dihydrogen Monoxide Alert

    A bottle of 99.93% pure DHMO (Dihydrogen Monoxide)

    Dihydrogen Monoxide:
    • may cause severe burns
    • is a major component of acid rain
    • has been found in excised tumors of terminal cancer patients
    • used in nuclear power plants
    • used in many forms of cruel animal research
    • may cause death by decreased effectiveness of automobile brakes
    Dihydrogen monoxide is colorless, tasteless, and kills uncounted thousands of people every year. Most of these deaths are caused by accidental inhalation of DHMO but, in addition, prolonged exposure to its solid form causes severe tissue damage. Symptoms of DHMO ingestion can include excessive sweating and urination, and possibly a bloated feeling, nausea, vomiting, and body electrolyte imbalance. For those who have become dependent, DHMO withdrawal means certain death.

    Environmentalists across the world all agree that DHMO contamination is reaching epidemic proportions.

    Our water: Quantities of DHMO have been found in every stream, lake, and reservoir in America today and now the pollution has also been confirmed in the Antartic ice. Despite theis, spokesmen for big business & government still claim that the public has nothing to worry about. Yet companies continue to dump waste DHMO into rivers and the oceans, and nothing can be done to stop them.

    Our food: DHMO is used in the distribution of pesticides. Even after washing, produce remains contaminated by this chemical.

    Dihydrogen monoxide is also known as hydroxyl acid, hydrogen hydroxide, or tap water.

    Saturday, October 31, 2009

    Modeling Life Effectively Disproves Zombies

    Zombies are on fire right now. From Zombie Nation to Zombieland, it's clear that our culture has fully embraced the concept of mindless drones living among everyday citizens. Thanks (no thanks) to the Twilight series for the assist in making the whole monsters in society thing acceptable (to high school girls; whose boyfriends are dragged along to the movie and have to suffer through listening to every other girl drool over the meth'ed up characters in that story).

    To this trend I say, NO! I'm calling shenanigans on zombies. Here's why:

    What is a zombie? Is it a virus? Dawn of the Dead, the 28 Days Laters, I am Legend, etc. would suggest that it is. We'll go ahead and say yes. There are plenty of models that predict dispersion patterns of viruses in society, but we can work at an even more basic level than this.

    Is a zombie still a human? Dawn of the Dead: No. Shawn of the Dead: Yes - AND you can play video games with them. Essentially, zombies are known as the "living dead," so I'll begin modeling from here to highlight the two main physical differences between humans and zombies.

    Humans are inefficient machines. We emit about 150 watts of energy as overall body heat. Although it would be more efficient to be cold blooded, we found certain advantages to remaining mobile and having an active metabolism when it gets cold. Further, the brain functions by sending around 20-40 watts of electrical signals around itself and throughout the rest of the body. When a zombie bites, a victim's body temperature drops and organs begin to fail. Other than the whole craving brains/flesh thing, the life of the human ends, thus the following model is developed:


    The life model disprove zombies

    Translated: A life is equal to a the sum of all days where the energy of ones body approaches 150 watts, and the energy of said brain approaches 20 watts. This is valid from a person's birth day to the nth day of an individual's life, otherwise known as a "life span" (Ls - see below):


    A life span is limited to n days

    Thus, it is impossible for a being to operate once a brain ceases to function due to a lack of energy production of its carrying body. This goes for "infected" humans or other animals. There is probably a better metric of brain activity that I could use, but I figure this model gets the point across.

    This is most importantly applicable when faced with a "I don't have time to zombify this costume" situation.

    Friday, October 23, 2009

    Office 2007, you're pushing my buttons! / Micosoft Inefficiency .NET

    This is unacceptable! A mail client should not use the same amount of resources as GIS software. I am convinced that Outlook 2007 is making my other programs crash. I've said it before, and I'll say it again. Office 2007 missed the mark.

    Here is a screenshot of my ArcMap editing session:


    I am running Windows Media Player in the background with with 200+ songs on the playlist (topping out around 20,000 k of memory usage). I am assuming WMP references the songs via a list rather than caching all the 855 MB of files, however my media player is using fewer resources than my mail client is using.

    Outlook is hogging just short of the almost 200,000 k that ArcMap uses - and it's just sitting there:

    Rather than trying to make Office and Windows look like a Mac, why doesn't Microsoft take what they already have a make it more efficient? After that, go ahead and add the neat little trinkets (about which I honestly couldn't care less). There is absolutely no reason for my mail client to use such vast amounts of memory and processing power to sit there and ding a few dozen times a day.

    Personal computer technology continues to increase at a terrific rate, and the price of powerful and small computers is steadily decreasing. The average user (non-tech/home computer user) seems to be utilizing web-based resources more and more. Other than gaming, I can only think of a few other examples of power users who need very elite computers: photo/graphics editors and video editors.

    Taking advantage of this by writing software that runs efficiently would allow one to use a computer for more than a few years without it being bogged down (I'm looking at you, Windows XP). It takes my laptop a few minutes to open Mozilla. MINUTES! That is just stupid.

    Instead, Microsoft continues to write clunky software that needlessly hogs computing resources so when the computer seems to become "out of date" in a year or two, unknowing consumers will go out and buy another laptop with a new and even more inefficient version of Windows products. This seems like planned obsolesence. Lame.

    Well, I'm glad to see that Dell (and others I'm sure) is giving the option for new computers to be loaded with the free Ubuntu (Linux) OS. I've been meaning to give Linux a try. Even worse, another option is to "downgrade to Windows XP" on new systems. Fail.

    Intro to Customizing ArcGIS Desktop, Toolbars, and Normal.mxt

    While attempting to build a (forthcoming) custom tool for my ArcGIS environment, I encountered a problem: I cannot save my new custom toolbar to Normal.mxt. Every time I close and re-open ArcMap, the toolbar does not return.

    I am attempting to construct a toolbar to use in my default environment, so naturally I begin working in a blank (Untitled) .mxd document. This is probably a problem: it seems that Normal.mxt is updated when the .mxd is saved or closed, so I'll start by creating a local project so the "save" command can be called.

    The following is my version of a walkthrough that discusses how to properly add a toolbar to the Normal.mxt template.
    • Start ArcMap with a new/blank document
    • Save this document anywhere - location is not important. It can be deleted later. Again, I'm assuming that a saved document allows the .mxt file to be saved, thus edits can be applied, though this is just a hypothesis.
    • Open the Customize dialog (from Tools :: Customize, or double click in a gray area beside a docked toolbar)
    • Choose New to create a new, blank toolbar
    • Give the new toolbar a name, and be sure to change the "Save in" option to Normal.mxt.
      ( Normal.mxt is the default, base template that ArcMap uses to define the which toolbars are included in its operating interface. When a new/blank document is launched, Normal.mxt is called to define which buttons and toolbars go where. Over time it is nice to change this around to suit individual needs)
    • The new, blank toolbar is added to the project
    • Add some buttons/tools/commands to the toolbar by navigating to the Commands tab from the Customize dialog. There are many provided by ESRI, sorted into Categories (the pane on the left) and the actual commands (buttons) are located in the Commands list to the right. Select the one you want and drag it carefully to the new toolbar, or to any other toolbar. Again, be sure to "Save in" Normal.mxt
    • To add customized buttons from which you can run your own Visual Basic code, scroll all the way to the bottom of the Categories list and select [UIControls].
    • Press the New UIControl... button
    • Choose from one of the control types - UIButtonControl will make a button that will run some code that will be programmed later - and press Create
    • Rename the control to something that will be recognized easily, and drag the control to the new toolbar
    • Change the button's icon/picture by right clicking on the button (with the Customize dialog still launched) and choose an icon from the "Change Button Image" sub-menu.A custom .bmp file can be used as the image by choosing Browse from this menu
    • To begin editing code, right click on a button (command) and choose View Source to launch the Visual Basic Editor (shortcut key Alt+F11)
    • Now close the Customize dialog box and save the otherwise blank ArcMap document. From here the new toolbar and its tools should be saved in Normal.mxt.
    • Just for the sake of argument, drag the toolbar to the top of the ArcMap window to dock it. (This really shouldn't be necessary though.)

    • Save the document again
    • Open the Customize dialog again and change the "Save in" option from Normal.mxt to the alternative choice which will be the name of the .mxd. If the toolbar is still present, the Normal.mxt template has been successfully altered with the addition of the new toolbar. Change the "Save in" option back to Normal.mxt and continue alterations if necessary.
    See also:
    ESRI Article: Save Custom Toolbar Configuration
    My Normal.mxt

    Wednesday, October 14, 2009

    Languages of Modeling

    I recently became interested in modeling everyday occurrences. This is mostly a joke, though it's definitely good practice to keep statistical analysis techniques fresh in my head. Additionally, it's helping me brush up on some much needed math topics that are in dire need of refreshment.

    To effectively convey this information (nerdy jokes), I realize that I draw upon four sorts of languages: English, stats, math, and the newest LATEX.
    • English is used to concisely describe a situation: "Shaquille O'Neal is the greatest living actor"
    • Statistical modeling is used to describe and quantify predictions, interactions, and tendencies: "My love of killing hookers by playing Grand Theft Auto is directly proportional to your love of killing literature by obsessing over Twilight - as modeled in relation to characters who look like they're addicted to meth." English is used as the core language, however the subset dialect of statistics is well defined. Certain graphs and diagrams are often added to convey an idea
    • Mathematics are used to explicitly define what is happening in a specific, overly technical, dry-witted manor:


    • and finally, the newest of which, LATEX, is used to create the pretty looking mathematical and statistical functions and algorithms: (see above)
    Throw in some HTML as the medium of dissemination, and you have one nerdy kid that needs to record more music and make some bad decisions.

    LaTeX is a markup language used in typesetting information into standard, pre-existing document templates. Whereas writing a paper usually consists of typing text into MS Word and setting the page margins, paragraph spacing, indentations, etc., the same plain text of the paper can be pasted into the LaTeX environment with bits of markup wrapping around it. All standard formatting is automatically applied so numerious authors can easily produce articles with the same formatting.

    Additionally, high quality formulas are easier to create. The methodical and intuitive prasing can get cluttered, but pretty much everything is grouped by braces ( { } ).

    As an example, here is the code used to create the formula above:


    Nickelback = {\sum{StabWounds}^{MyEars} \over{time}} - Enjoyment(life)

    While reading just a little bit about it, I immediately began to recognize this as the formatting used in many of the journal articles that I read. Of course I learn about this on my way OUT of grad school! Instead I'll use it for nerdy internet jokes. Wonderful.

    Sunday, October 11, 2009

    App Idea: Facebook History

    I've tried on a few different occasions to see how I have previously wasted my time in the past. I scroll to the bottom of my Facebook wall, click "Older Posts" and repeat. This happens up to a half dozen times before I loose interest (I've read studies that internet users' attention span is as short as seven seconds [I would have posted links, but I don't feel like reading these articles]). This technique usually yields no more than a day or two of my Facebook history. Who cares?

    I'd like a more efficient way to (possibly) quantify and (more importantly [not importantly]) reflect on just how much of my youth I have wasted. Assume each wall post can equal 10-20 seconds, each posted picture/link amounts to a bit more time, etc. Also, it'll just serve as a simple tool to navigate through a given time frame to see what you/your friends were up to at least 100 years ago.

    Thursday, October 1, 2009

    Calculate Lat/Long Values in ArcMap

    Yet again, I had a difficult time finding sufficient information on calculating latitude and longitude values for a point shapefile. I've only encountered one or two situations in the past few years where I worked with a coverage that was missing these data, though it's still a basic and important technique that should be addressed a bit better.

    It turns out that (at least) ArcMap 9.2 provides a pretty simple method to quickly calculate a number of geographic coordinates. A few things are important to consider though:

    Converting Polygon to Point data:
    Unless you're interested in the locations of polygon boundaries (shorelines, property boundaries, etc. - in which case you will convert the polygon boundaries to nodes), you will want to create a point coverage to represent centroids. Be sure to choose whether that center location will be the true center, or be preserved within the bounds of the polygon:

    • Show ArcToolbox in ArcMap (or ArcCatalog)
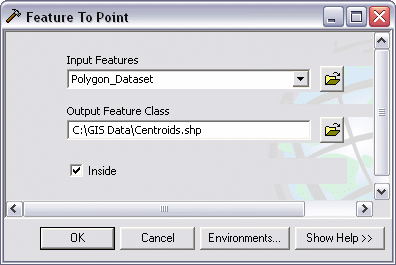
    • Open the Feature to Point tool
      (Under Data Management Tools :: Features :: Feature to Point)
    • Press Show Help to read more about the tool
    • Select a polygon or line feature to use as in input featre
    • Set an output location and name for the resulting feature class
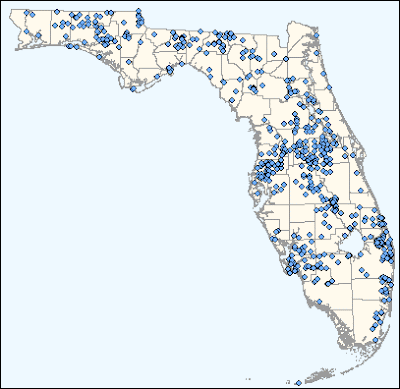
    • Check the "Inside" check box to calculate a centroid within the boundary of a given feature (i.e. a "bent" polygon similar to the shape of Florida can have a centroid in the Gulf of Mexico if "Inside" is not selected)


    There is insufficient information on the internets about this process works. There is a simple and automated calculator built into atribute table field calculations. To make this work properly in this situation (calculating geographic latitude/longitude coordinates) the coordinate system must be set to a geographic coordinate system, rather than a projected coordinate system.

    Calculating Lat/Long Coordinates:

    • Add a point coverage to a project
    • Change the data frame to a geographic coordinate system
      • Right click on the data frame heading in the table of contents pane and choose Properties
      • Navigate to the Coordinate System tab
      • Expand the Predefined branch
      • Expand the Geographic Coordinate Systems branch
      • Expand the North America branch
      • Choose North American 1983 HARN and click OK
      • Choose Yes if prompted with a coordinate system warning
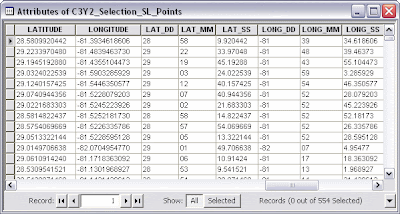
    • Open the layer's Attribute Table and add the following fields /types (LONG_DD is indeed string 3, not a typo)
    Field Name
    LATITUDE
    LONGITUDE
    LAT_DD
    LAT_MM
    LAT_SS
    LONG_DD
    LONG_MM
    LONG_SS
    DATUM
    Type/Length
    Text (string), 20
    Text, 20
    Text, 2
    Text, 2
    Text, 9
    Text, 3
    Text, 2
    Text, 9
    Text, 25
    • Go ahead and calculate "North American 1983 HARN" (or whatever coordinate system you used) in the DATUM field.  Whomever uses this data in the future will need to the method used to calculate the units
    • Now begin to calculate the units.  Right click the LATITUDE field and select Calculate Geometry
      • Set the Property to "Select Y Coordinate of Point" (Latitude = y, and Longitude = x)
    ! Note that Latitude = y and Longitude = x. Usually you'll ask for "x/y coordinates" in geometry class, however surveyors ask for "a northing and an easting" - which flips the order of the x and y values around.
      • Select "Use coordinate system of the data frame" to use the geographic coordinate system. After this, the Units will change from various length units of measure (meters, feet, etc.) to a number of DMS choices
      • Select "Packed DMS Format (+/- DDD.MMSSssssss")" and hit OK
    • Repeat this for LONGITUDE with "Select X Coordinate of Point"
    • Use the Field Calculator to populate the remaining fields using the following formulas
      • LAT_DD: left([LATITUDE], 2)
      • LAT_MM: mid([LATITUDE], 4, 2)
      • LAT_SS: right([LATITUDE], 8)/1000000
      • LONG_DD: left([LONGITUDE], 3)
      • LONG_MM: mid([LONGITUDE], 5, 2)
      • LONG_SS: right([LONGITUDE], 8)/1000000

    • Finally, be sure to Calculate Geometry again on the LATITUDE and LONGITUDE fields (Using the coordinate system of the data frame) but set the units to Decimal Degrees.  Until this is finished, the values look like decimal degrees, but if these coordinates are projected, they will be incorrect - perhaps by a long way.  A good trick is to see if any values after the decimal are greater than x.599999.  If there are any values between x.6 and x.9, those are indeed decimal degrees.
    There are a few other formats that may be more appropriate for individual projects. Some custom utilities will require lat/long processing fields to match, so be careful with the LAT_DD/LONG_DD fields; thus DMS fields may need to be converted to another data type.  Further, field types of Double and Short Integer may be more appropriate for your database.

    See also:

    Angular Unit Conversion (convert between DD, DMS, and radians)
    How To: Populate x, y, or z point data fields of an attribute table

    How To: Calculate Latitude and Longitude values using the Field Calculator

    Monday, September 28, 2009

    Working With Text Files in Visual Basic

    Visual Basic can be an effective medium used to track calculations in a session of work, however the variables, objects, strings of text, numbers, etc. are volatile; anything created or calculated will be lost when the program is closed. A few of the apps I developed make use of saving certain pieces of information to a small text file before the program is closed, and retrieving the information and putting those pieces back into the app when the program is loaded later.

    These text file handling sessions are basically simple enough, but can get a little more complicated when specific logic is required - I'll get into that later.

    First off, open Notepad or another light text editor and save a new file. I like to change the extension from .txt to something that is unique to my project - for instance .jus, or .anp, etc. The suffix can be anything; I like to change this from .txt so it is less likely that the file will be opened or its contents changed. Restructuring the contents may cause errors when it is loaded by the application. The .txt suffix can also be used as an alternative, however.

    ArcNotepad.anp is the newly created text file

    To save a text file with a unique suffix, change the "Save
    as type" to "All files" and it may be necessary to put quotes around the file name from the Save As dialog box:


    Save text to a file:

    Private Sub Save_Click()

    Open "C:\ArcNotepad.anp" For Output As #1
        Print #1, "1st line of the document"
        Print #1, "2nd line" 'Line 2, etc.
    Close #1

    End Sub


    Retrieve text from a file:

    Private Sub Load_Click()

    Dim strLine1 As Integer
    Dim strLine2 As Integer

    Open "C:\ArcNotepad.anp" For Input As #2
        Line Input #2, strLine1
        Line Input #2, strLine2 'etc.
    Close #2

    End Sub


    That's it for the basics, but let's insert some logic into this. The previous two examples will work if your formatting will be standard - that is, if the text file holds a set number of values/variables that will be updated over and over again, but the number of values will not change. An alternative situation is when lines are added or removed from the text document. The application will not know how many lines are included in the text file, and this is poses a problem. This dynamic text file requires some additional coding to be handled properly. The next time the document is accessed, there will be either:
    • lines that are overlooked (more lines in the text file exist than the previous code looks to retrieve), or
    • the program will return a "Run-time error '62': Input past end of file" error (there are too few lines available for the program to retrieve).
    As an example, consider that the two lines "Another line" and "Even more" are added to the text file and saved, for a total of four lines of text. The application will need to read through the file and count how many lines there are. Next, a dynamic array will be created and populated based off of the primary count.

    Private Sub Load_Click()

    Dim i As Integer

    Dim blank As String


    'Count the number of lines in ArcNotepad.anp
    Open
    "C:\ArcNotepad.anp" For Input As #2
        Do While Not EOF(2)
            Line Input #2, blank
            i = i + 1
        Loop Close #2

    'Break: Show number of lines in ArcNotepad.anp
    MsgBox "Lines: " & i
    Dim ii As Integer
    'Create a dynamic array, of size i
    Dim strLine() As String

    ReDim
    strLine(i)

    'Populate the array with lines from ArcNotepad.anp
    Open "C:\ArcNotepad.anp" For Input As #1
        Do While Not EOF(1)
        Line Input #1, strLine(ii)
        ii = ii + 1
        Loop Close #1

    'Report the array via message box
    Dim iii As Integer
    Dim strMessage As String

    For iii = 0 To i - 1
        strMessage = strMessage & _
        "Line " & iii + 1 & ": " & strLine(iii) & vbCrLf
    Next iii

    MsgBox strMessage

    Thursday, September 17, 2009

    VB / ArcObjects Cheat Sheet

    I've been discussing code a bit, and for the non-coder it will make little sense. ArcGIS, along with many other Microsoft-based software packages can be easily customized, and a lot of really cool (nerd) tools and applications can be created with only a little bit of training.

    There are many free resources on the internets that explain in great detail how to begin coding. I started learning Visual Basic last summer and have already released an ArcGIS toolset used by the Florida Department of Environmental Protection.

    During that time, I saved a few bits of information that I found important to remember, so I threw together this cluttered
    PDF file as an ArcObjects Cheat Sheet (VB Reference Sheet):

    - Download the VB / ArcObjects Cheat Sheet -

    Further Resources:

    Thursday, September 3, 2009

    Tetris is Aware


    I am almost certain that Tetris software is not only cognizant, but I swear that it's also sentient. There are many times when sequences of pieces cannot possibly be part of any random combination
    • Every once in a while it'll throw me a bone and send a few good pieces my way when I get out of a particularly difficult situation
    • It teases me after level 12 by sending groups of I-pieces () - almost to say, "Ha! Bet you didn't expect these NOW!"
    • It knows it's time for bed and starts sending ridiculous sequences of only S and Z pieces ( ) when I've been waiting patiently for an I and there are no good locations for such pieces
    I am also beginning to suffer from the Tetris Effect - where one begins to see shapes and attempt to solve lines, away from the game. The first time I had this happen was when I played a lot of competitive The Next Tetris with some friends back in high school.

    Saturday, August 22, 2009

    Masters Research using Google

    Why do I not own stock in Google? The bubble has not burst yet so it seems pretty solid; with GOOG-411, the forthcoming Google Voice, and Google Wave, etc. Let's go holidays!
    Update: RIP Goog-411, hello Android voice-to-text

    Speaking of celebration, I just finished my masters research. I was assisting with (and thanks to the shortcomings of ArcMap, I am continuing to finish) research at Florida State University which is continuing to investigate spatial patterns of cloud-to-ground lightning flashes across various landscapes. My contribution primarily aimed to build a geoprocessing model to assist with the preliminary data preparation for future iterations of similar research. Some other bricka-brack followed.

    I decided to write it using Google Docs because I knew I would be working at home, in my office at DEP, and on campus and versioning is a pain in the ass. This is the 90's... nobody needs to save separate/new copies to a flash drive or send via e-mail anymore. This allowed me to edit a standard copy from various locations on demand. Very clean. Of course I formatted and submitted the final versions with Word (2003), though this MS Dependency is becoming increasingly antiquated with the assistance of LaTeX (a very good formating and publishing medium).

    Although I didn't really need to use this feature, it is easy to set permissions and invite other users to view or edit any text document, spreadsheet, form, or presentation thuswise:


    I strongly recommend reading the Survey of Literature / Background and ignoring the rest of it. It "briefly" introduces what a thunderstorm is and how they are created.

    There are around 40 references in total (each document basically composes the final report) - to which I would like to give many thanks to Google Scholar and Google Books.

    Scholar is aided by a proxy connection to FSU's library which has subscriptions to many of the journals that are returned in a search. Books doesn't have every book, nor does it allow users to see every page of all available books, however I was able to serach thousands of books for a single word or phrase, and the results are not only higlighted, but each page is presented with separate previews and links to the specific page of the book.

    I can't imagine a world (I'm looking at you, the 20th centrury) that did not have the luxary of these efficient tools. Walking to the library and reading through hundreds of pages of books and journals absolutely has its benefits (learning vast amounts of supplementary information and providing a more comprehensive overview of the topics of interest), but it's for suckas.

    Tips for Digital Audio Recording & Increasing Computer Speed

    My computer is a few years old now (got Lappy Tappy for Hanukkah, 2005), and it's filled to the brim with all sorts of (mostly) high end software for spatial modeling & image processing (ArcMap, Erdas Imagine, IDRISI Andes, R, NetLogo, and some GPS utilities) and music production (Cubase, Fruity Loops, Ableton Live, Reason, Audacity, Guitar Pro, NoteWorthy Composer, and some other mixer and MIDI interface tools).

    Wow, didn't realize how bad it really was. It takes forever (a good five minutes) to load Mozilla - which encompasses 90% of my workload on here. It seems silly to bog it down with all that software. Rock Machine is significantly more powerful, however I rarely use it because it's in the recording cart (still upcoming post) and it's just easier to use Lappy Tappy for every day communication in front of the tele.

    Anyway, I came across some tips for speeding up a computer. Enjoy.

    Tips and tricks for music and computers
    Optimizing Your Computer Recording System
    http://alesis.com/tipsnov08


    A few good starting points of my own:
    • Clear off the desktop. Put all of those random folders, mp3's, images, shortcuts, etc. in My Documents or somewhere else. Consolidate into a single "Desktop Junk" folder.
    • Empty your recycling bin
    • Clear out C:\temp
    • Clear internet browser history, temporary internet files, cookies, etc.
    • Remove programs from Start :: Programs :: Startup
    • Disable startup programs
      • Go to Start :: Run
      • Type msconfig and hit OK
      • In the Services tab, check 'Hide All Microsoft Services' and then uncheck anything that looks unnecessary (i.e. Google / iPod updates, etc)
      • In the Startup tab, uncheck anything that seems unnecessary. Expand the Command field to look for updates, media launchers, peripheral (printers, cameras, etc) management, etc. Use a search engine to investigate unknown items
      • Hit OK and restart the computer
    • Run a Virus Scan (AVG is free and light)
    • Run Ad-Aware free adware removal software
    • Run Malwarebytes free malware removal software
    • Move Pictures, videos, music, homework, old files, etc. to a portable hard drive (I suggest a hard drive that is powered by USB and does not need to plug into the wall, for instance the Western Digital Passport)
    • Uninstall uselesss/unused programs or games from Control Panel :: Add or Remove Programs. Often you can save data or save files and remove the game that isn't played
    • Clean your registry. There are a few good utilities out there to do this. If you don't know what it is then don't bother, so I won't post links.
    • Finally, defrag your hard drive overnight and restart in the morning
    • I've never used it, but it would be wise to set a system restore point (Start :: Programs :: Accessories :: System Tools :: Backup)

    Monday, August 17, 2009

    Using High Resolution Satellite Imagery to Map Black Mangrove on the Texas Gulf Coast


    Presented 3 February 2009
    Spring 2009 Advanced Remote Sensing
    Florida State University

    Reviewing the work of Everitt, J.H., Yang, C., Sriharan, S., and Judd, F.W. 2008 Using High Resolution Satellite Imagery to Map Black Mangrove on the Texas Gulf Coast. Journal of Coastal Research, 24:6, 1582-1586


    This is the (very abbreviated) presentation I gave summarizing the article above. My presentations usually go into illustrative detail about each point, so the information in the Power Point document itself is not as informative. The presentation discusses a brief introduction on the species, their location and salt-tolerant characteristics, importance of mangroves habitat, etc. followed by more technical information regarding remote sensing techniques, methodology and sampling design, accuracy assesment and field verification, and finally a brief discussion (mostly omitted from the presentation) regarding analysis of the results of the study.


    Wednesday, August 12, 2009

    When in doubt using Visual Basic, hit Ctrl+T: A short guide to adding controls

    I am used to programming with the Visual Basic Editor in ArcMap, Excel, and Access. I'm building a weather client (upcoming article) that will be a one stop resource for various weather maps, models, and surf reports from around the Internets that I use to help predict my next surfing or diving trip. The best way to manage all of these maps and graphics that I can think of right now is to use a multi page control to separate the various groups into individual tabs.

    This is easy enough in ArcMap - the MultiPage control is already loaded onto the main toolbar (left). Visual Basic is a bit more tricky however.

    Many extra options and controls (including a previous post about the Common Dialog) are not automatically loaded onto the Visual Basic 6 general Toolbox by default. By right clicking in some empty gray space away from a tool, or by pressing Ctrl+T, one can launch the Components window. From here, a number of additional controls can be added to the toolbox to be inserted into a form or project. In teh following case, the Microsoft Tabbed Dialog Control 6.0 is checked. A TabStrip can also be added through the Microsoft Windows Common Controls - I used 6.0 (SP6) which is a few below the Tabbed Dialog Control.


    A multi page tab system can be inserted to to organize the data inside of this new form:


    This is the VB 6 toolbox from which the new control can be called:


    If there seems to be something missing from a Visual Basic toolbox, hit Ctrl+T and skim through the available controls - it will probably be located in there.

    Wednesday, August 5, 2009

    ArcMap Win: Access Data View Elements from the Print Layout View

    When in the ArcGIS layout view, double click on the data frame to access annotation, graphics, or any other cartographic elements that are located in Data View. Elements found only in layout view (legend, north arrow, scale bar, text, etc.) will not be selected when accessing the data view from layout view. It's a quick way to manipulate the map design without having to fully switch between the two views or without having to redraw the map.

    When you double click on the data frame a small, hashed border will appear around the frame's neatline signifying that only the elements within the data frame are being accessed.

    This is great for placing manual text annotation within the map itself, rather than just adding various extra text elements to layout view. By placing them into the map it is possible to pan around while keeping the label in reference with the geography of the area of interest.

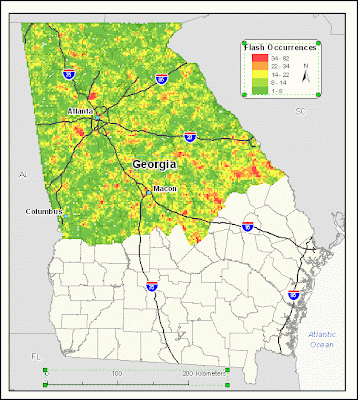
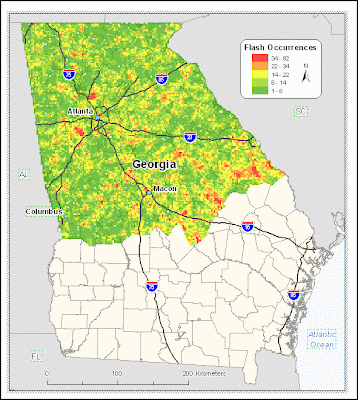
    Here the legend graphics, scale bar, and the text element of Georgia are selected in layout view:


    Now when attempting to select all elements (via the Select Elements tool, or by Edit :: Select All Elements), only those elements included in Data View are selected. In this case, all city and state labels, and interstate markers were converted to annotation:

    Tuesday, July 14, 2009

    Additional Blog for Mobile Updates

    I started a blog for my cell phone. It has a qwerty keyboard and camera and I seem to often encounter mildly entertaining hilarity. The internets must know about this.

    Peep justin-berke.blogspot.com.

    Monday, July 13, 2009

    Website Ideas: FML-Style Web Sites

    In the style of FML and TFLN, where users submit short, text based hilarity, I'd like to build three web sites.

    One is dedicated solely to "That's what she said" opportunities from inappropriate situations. As much as I would like to shout it across a meeting with my division director, or at my roommate's mother when she walks into a giant bucket of hilarity, I'm often bound to a puritanically imposed sense of of tact.

    The second is simply a compilation of quasi-believable erroneous facts. For instance, skin is actually an acronym for its composing elements: Sodium Potassium Iron & Nitrogen. The human body contains exactly 100 bones (101 if you count the skull). Fire ants prefer hickory BBQ sauce. Pi is exactly 3. That sort of thing. See Look Around You.

    In an xkcd stylee of nerdiness, the last is a site dedicated to user-submitted equations, algorithms, functions, statistical inferences, etc. that model everyday occurrences or nuisances. For instance, Matt's First Law of Mexican Restaurants states that "The quality of cuisine at a Mexican restaurant is inversely proportional to the cleanliness of its bathrooms," or my postulation that "the likelihood of vegetarian options existing on a given menu decreases as the number of televisions at a restaurant increase." Yeah, statistics jokes are GOLD these days. Also, jokes involving computer programming/coding or diagrams (chemical, physical, electrical, etc.) are fair game. OpenWetWare has a cool santax for creating diagrams.

    I created new blog called Unnecessary Modeling. For now I'm using the graph builder at GraphJam for my templates, but they're not showing up as well as they could, so I might switch over to Google Docs soon.

    These are not really that great but I would like to learn basic web based database management programming. I love LAMP!