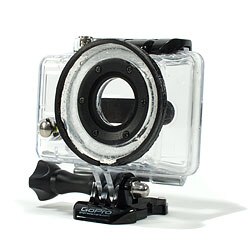
"58mm Telephoto Magnification Lens, Accessory for Cameras 58MM 2X Magnification Universal Teleconverter Telephoto Lens for Cameras"
The Pitch
"Bring objects you are photographing twice as close perfect for sports photography, bird watching, nature and anytime you need that extra distance. DOUBLE YOUR LENS FOR FRACTION OF THE COST OF NEW ZOOM LENS"
The Price
Only $13.99 on eBay, or $12.99 - $19.99 on Amazon. It's even available on B&H for $32.99 branded as Vivitar. All available for various filter sizes.
What?
Many beginner DSLR packages on Amazon come bundled with a lot of beginner gear that I endearing refer to as toys. In that previous link, I've given my perspective on the usefulness of many of these common items. Tl;dr - they're fun to play with for absolute beginners, and the gear is generally outgrown very quickly. Some items last longer than others; some items are not safe to use from the beginning.
One item in particular that I'll argue isn't particularly helpful from the very beginning is the 2X to 2.2X Telephoto Adapter, marketed with different branding depending on where you're seeing it sold.
Test Gear
Since this lens came with a basic DSLR gear package, I'll test it with two other common beginner/kit lenses and an intro body:
Canon T5 body
Canon 18-55 f/3.5-5.6 IS II "kit lens"
Canon 75-300 f/4-5.6 III USM "kit telephoto lens"
Test Conditions & Photos
The following are the resulting photos with minimal processing - just a slight exposure adjustment and nominal sharpening added to each raw file, then they were exported as JPEGs. As a parent to a toddler and an infant, I haven't had a ton of time to test this in optimally bright and uniform conditions of afternoon daylight. These photos were taken close to sunset with low level clouds passing in front of the sun so daylight was fading very quickly.
Ideally an ISO of 100 should be used while maintaining a high enough shutter speed to mitigate camera shake. While I came close to mitigating camera shake, a tripod/lower ISO/better testing conditions are desirable for a better comparison.
Additionally, I accidentally shot at 50 mm instead of 55 mm for the 18-55 control shot with no adapter.
Maybe I'll get around to updating this image set.
Images:
Kit Lens
18-55 @ 50mm
ISO 100, f/5/6, 1/125s
18-55 @ 55mm + 2.2x Adapter
ISO 100, f/5.6, 1/125s
Wide Kit Telephoto
75-300 @ 75mm
ISO 400, f/5.6, 1/250s
75-300 @ 75mm + 2.2x Adapter
ISO 400, f/5.6, 1/200s
Long Kit Telephoto
75-300 @ 300mm
ISO 1600, f/5.6, 1/200s
75-300 @ 300mm + 2.2x Adapter
ISO 1600, f/5.6, 1/200s
This is the most important comparison. Extending the kit 18-55 mm lens with a 2x tele adapter is significantly less sharp and more heavily distorted with image degradation issues.
Wide Kit Telephoto, Adapted
75-300 @ 75mm + 2.2x Adapter
Image degradation is absolutely apparent, and this will be as best as the image quality gets on a telephoto lens.
ISO 1600 is my personal limit of ISO speed on this intro body to balance noise in low light. This kit telephoto lens works best around f/11, and f/5.6 is often too soft @ 300mm for really enjoyable results. 1/200s is far too slow to shoot at 300mm handheld.
Despite those very important and clearly sub-optimal shooting conditions, it cannot be any more apparent how much image degradation is occurring. Terrible sharpness, awful contrast, muddy/abberated colors, etc. Just night and day bad.
Conclusions
These test photos are essentially straight out of camera JPEGs. No effort was made to clean up noise, sharpness, color, contrast, texture, etc. so these are quite unsightly as-is. Any photo taken with a camera (film or digital) needs some amount of work to be developed into a pleasing photograph. These have the absolute minimum amount of processing to share across the Internet.
I'm used to shooting a lot of work with my kit telephoto lens and I have learned to mitigate its shortcomings quite significantly. These photos are pretty crude, and I would say that there are a few instances where the telephoto adapter can be improved; but by and large any improvement attempt is much better addressed by simply cropping in on an un-adapted lens.
Test shooting conditions aside, there is no doubt that this adapter is not helpful, and simply cropping will provide vastly superior results.
Don't bother with this lens.
The least amount of negative distortion and image degradation occurs at widest focal lengths on a given lens, and it immediately gets unusable on a dedicated telephoto lens. Even the Internet's most hated lens, my EF 75-300 mm, is far superior - and it can be picked up used as low as $25-60 on eBay or $60 on KEH or MPB.
Save the $15-35, and shoot for a kit telephoto between $25-60 used, or under $200 brand new.
There's More:
The photography community exhibits an incredible amount of gate keeping. That is: advanced users disappointingly often provide intellectually dishonest, lazy answers to novice shooters that give a perception that newcomers are not worthy of attaining high-end image quality without paying a toll of incredible expense or sheer luck in gaining experience from rote practice. In the case of this test, folks will suggest incredibly expensive lens options and discount the value of kit telephoto equipment, even though there are many truths to the image quality differences between kit lenses and advanced/pro gear.
That is not my intention with this review. There is value in using most basic gear. Of course if one has the means, a middle of the road package will provide plenty of quality to bolster success in a hobby without breaking the bank. In many cases, however, there is plenty of room to grow with absolute beginner gear on the lowest end of the budget spectrum.
Again, this telephoto adapter lens is not worth it.
Tony & Chelsea Northrup Vast wealth of information on all aspects of photography from basic exposure tutorials, gear discussions, training, business, community interaction, photo critiques, etc.
Mango Street Tastefully trendy photography tutorials that cover everything from posing models and selecting locations to shooting and editing skills
Riley Brandt Tutorials on processing photos with free & open source software including darktable and Gimp
Sean Tucker Very high quality tutorials, examples, and discussion on shootoing, editing, creating in various genres
Taylor Jackson Great mixture of breaking down high end, pro-level shooting and editing; awesome quick tips; and other longer form vlog chats about photography
Peter McKinnon - Good info. The channel is super popular and it's getting a little too Vloggy more but there's still good info on shooting, editing, etc.
Run N Gun Very short and to the point lessons with tips, tricks, and info on photography
workphlo Commercial product photography methods that cover lighting, shooting, compositing, and editing. Although product photography isn't a particularly popular subject, these tutorials provide incredibly rapid and easy to follow illustrations of very advanced lighting, compositing, and editing techniques which are useful in all other forms of photography. It's really helpful even if you're not interested in product work, and the skills are delivered so clearly that it's easy to learn a lot that you can apply to your own skillset
Rich Baum Real estate photography essentials. Lots of really well explained examples of a technique called "flambiant" which is a composite of flash and ambient exposures.
My own collection of the most helpful videos I've seen on photography to bring you from absolute beginner to advanced lighting/shooting/editing proficiency; or to shore up gaps in your skill set with excellent tutorials. This is a work in progress, but any of these current videos should give you ideas and recommendations on where to look next for various topics on photography
I got an accessory bundle with my first DSLR camera, and the accessories are mostly garbage. Fun garbage - and it has been somewhat useful to learn how cheap crap tacked onto a camera makes my images worse. Still, the extra trinkets are mostly very low quality toys that don't really help 99% of the time.
It surely seems like a giant bundle is the only way to go.
The only useful items in these kits are:
the camera body itself
the main kit lens (18-55 mm, f/3.5); sometimes they come with a kit telephoto lens too (75-300 mm f/4, or similar)
the carrying bag
SD cards - although SanDisk and Transcend are usually the only brands on my "trusted" list. Look up the quality of other brands which, worst case, may leave you with lost vacation photos
Sometimes these come with a rocket blower or an USB-SD card adapter
That's really about it.
Garbage breakdown
Don't put your camera on that tripod! My tilt arm stripped the first time I used it and it came crashing down onto my hand. Thankfully the lens just pinched my hand and didn't crack into the tripod itself or tip over altogether; but that much weight banging against the lens is bad news. Any kind of fall could have damaged the lens or worse.
That super flimsy tripod is really designed for small point and shoot cameras at most. You may be okay with the smaller 18-55 kit lens for a couple sessions, but anything bigger - especially any telephoto lens or heavier, higher quality lenses - will be way too much for this $10 tripod to handle and it will fail.
Your safest, cheapest bet is to use something at least in the $20-30 range. Big box stores are just fine. Pick up and move the pieces around a bit. If it feels super flimsy, then consider upgrading.
All Canon/Nikon/etc. cameras come with the battey, charger, USB cables, strap, and sometimes a basic shutter release cable. Don't be fooled into thinking this kit is hooking you up with that stuff. It comes standard.
Tulip / petal style lens hood
The tulip petal hood doesn't work on this lens because the focus ring rotates as it focuses so the edges rotate into your frame. The circular hood might be more helpful for these intro kit lenses
The two screw-on lenses aren't great (see below). The wide angle adapter is actually kind of fun, but the sharpness is definitely reduced and there's a strong vignette when zoomed out all the way (which is the only place this attachment is actually useful).
The magnifier/macro attachment definitely degrades the quality of the image! It doesn't really help much for macro shots and if you need extra reach beyond 55 mm, just upgrade your setup soon to include the kit telephoto lens if you don't already have it.
Technically folks suggest not to attach anything heavier than a filter to the end of your lens so you don't wear out the focusing motor. I didn't have any trouble when I used the wide angle attachment, but it's definitely a beefy piece of glass hanging on the end of some delicate, precision hardware.
Filters and attachment lenses
The filters aren't particularly helpful either (see above). They're super cheap and they end up degrading your image quality more than anything; although I usually use the UV filters to protect the main lens elements from scratches. I'm sure there's some image quality loss and reflections that are added so I should really try shooting without them to see if there's any improvement.
The ND-style "darkening" filter isn't really dark enough to make a huge difference for longer exposure daytime shooting, and the rose-colored filter is something I'd expect to see in underwater photography, so I'm not really sure what to do with it here. I found that one weird more than anything: maybe it's supposed to make everything monochromatic? I don't know, it just made my white balance insane.
The flash isn't any more powerful than your on-camera popup flash; you can't change its direction to bounce off of walls or ceilings, so it's just as harsh lighting as your camera's popup flash; and you can't adjust its power, so it's pretty limited in usefulness.
Basic flash
However this super intro flash IS fun to mount on that flimsy tripod if it comes with a ¼"-20 coldshoe adapter arm like mine did (see below). This may allow you to start playing with off-camera flash effects.
Coldshoe adapter that can help mount your flash to a tripod
Analysis
All in all, it's not really worth it because they're all bottom of the line quality accessories - usually even down to the SD cards. However it's only $50 bucks more for a bunch of toys that will help keep you stoked about photography right from the start; which is definitely important. Technically you'll pay that much for a couple higher quality SD cards and a rocket blower anyway, so sure, it's kinda worth it in my opinion.
Recommended DIY Kit
Start with a camera model that just comes with a kit 18-55 mm lens
Grab a camera bag to safely carry and organize your lenses and camera gear. My kit came with a cheaper version of this Amazon Basics bag, but this looks even better
NOTE: Never use any brush on the camera's sensor. A gentle squeeze of the rocket blower to an upside down body with the mirror locked up is all you need. Also, default to the blower for 99% of your lens cleaning. Unless you physically touch your lens glass, avoid touching the glass to get the most life out of your equipment.
Spend at the very minimum $20-30 on a tripod. Anything cheaper is dangerously weak and not designed for heavy DSLR or even mirrorless cameras - as I outlined earlier. Save up for a nice tripod in the $100-150 range. It seems like a lot but the added strength will provide steadier shots, and you'll have a better time with easier setup and more control over precise placement and smoother adjustments.
A nice tripod won't have stablizing arms that connect to the shaft. The main legs should be able to move independently, and can angle out and lock into several wider positions.
I leave my quick release plate attached to my camera at all times, and there's a solid metal loop that I can clip a should strap to for easier carrying than the normal camera neck strap.
A simple intervalometer like this can be used as a remote shutter release, and to easily shoot time lapse images
Finally, a basic adjustable speedlight. A $25-40 model that can tilt and rotate allows you to bounce light off walls and ceilings, and basic power adjustments allow you to dial in or slack back on the amount of light being blasted out. There are more advanced $100+ Canon clones by Yongnuo that can communicate with your camera for faster, automatic metering and adjustments, but that can definitely wait. Stick with the Amazon Basics version of the flash above
That's about it. If you're playing with flashes, you can grab some handy remote triggers, color gels, or even an intro lighting kit with an umbrella or a softbox; but the gear listed here is what I use very regularly.
To be as thrifty as possible, start with the body, kit lens, and a camera bag to keep the camera safe. The upgrades listed in this section are as cheap as possible with at least some useful quality to them; and are easy additions down the road. Get out and learn how to shoot.
Shooting photos and video allows me to share some of the coolest activities that my friends and I do in our spare time. As fun and engaging as underwater photography is, it's easy to get caught up in shooting, and that can quickly makes the the dive a bit less enjoyable. It's so refreshing to dive without cameras after a few dives in a row behind your photography equipment.
Even strapping a GoPro to your head can be a distraction. It's important to continually check to ensure that a camera is still securely attached, especially when it's not in your hands or otherwise safely clipped to your BC. Additionally - even with hands free cameras - it takes a lot of work and focus to keep your head still to avoid shaky shots and jerking pans. I can't stand shaky video, or movies that rapidly jump around from one view to the next, with no real intent or structure.
It would be nice to have a camera in the water, passively capturing photos and video from a dive without having to worry about setting up a shot or any other equipment responsibilities.
This is an idea for a camera rig that can trail along from the line of a dive flag or surface marker buoy. The trailing fins can stabilize the camera's direction to face into a current or underwater path as the rig is clipped to bolt snaps along the down line near the surface or at a greater depth.
Below is an illustration of the rig in the water. I didn't make a bolt snap for this model, but the rig will be clipped to a bolt snap that is tied into the down line. The bolt snap will clip to the D-rings/U-bolts that run through the body of the device. It will probably need an adjustable counter weight on the inside that can be adjusted to keep the rig horizontally balanced with a threaded rod assembly.
Attaching the device to a down line from the middle of the body keeps the line out of the view at all times. Any current or movement in the water will keep the surface marker buoy trailing behind divers. The forward facing camera will generally keep the divers more or less the focus of the shot throughout a dive.
Here is a closeup of an attachment idea. Screwing a GoPro with a tripod mount to an end cap with a 1/4-20 bolt stickout out of a PVC end cap (similar to my previous "GoPro pointing stick").
I'm a tech savvy, outdoorsy, surfer/scuba diver/swimmer/water enthusiast, and I am creative enough to want to start making videos and shooting photos of my favorite outdoor activities. I decided to invest in a GoPro HD Hero a few years ago. Here's what I have learned since then.
!Feel free to browse the main points since this is such a long article:
You need a high end computer to edit high end video
You need a flat lens to shoot with a GoPro underwater
Choosing video editing and conversion software
Choosing photo editing software
Image processing techniques
Camera Selection Part 1 - Do you need a GoPro?
Camera Selection Part 2 - Consider a point & shoot with a housing
1) You need a high end computer to edit high end video:
Having seen friends transfer their camcorder video to their laptops and stitch some movies together in the past (several years ago), I figured that I might only have a little lag and jumpy playback to endure while editing. I was completely wrong. Even after shooting 720p video (great, but reduced quality) and further converting it to a reduced format and resolution, my video editing software (a.k.a. Non-Liner Editing system, or simply an "NLE") would simply crash after shortly after I added any of the video files to a project. Thinking harder about those videos my friends produced, the size of the videos were always pretty small.
If you plan to invest in a camera, make sure you have a computer that can handle editing high definition video. Otherwise, be prepared to upload full clips directly to YouTube, etc. Be advised that I will immediately down-vote and close your video if the clip begins and ends with you fiddling with the camera. Some form of basic editing is a must - it doesn't take much.
I'm in the process of building a computer that will hopefully be able to handle editing 1080p video. Here are some recommendations:
CPU - The Intel Core i7 series is currently the industry standard, but it comes with a high price. The i5 line is known to get you by.
I'm interested in trying to go with an AMD processor for around $100 less. A great AMD processor seems to be the Phenom II X6 1090t. It has six cores running @ 3.2 GHz. Very fast.
RAM - Memory is relatively inexpensive and the costs will continue to decline. Start with at least 8 GB (if not 12 or 16 GB) if you're looking into a new machine. Make sure your motherboard can upgrade to 32 gigs for future upgrades, but 8-16 gigs will get you started. Shoot above the mid-point of the frequency rating for the motherboard's supported ram speed. 1600-1800 MHz should be plenty of speed for a while; moving into the 2000 MHz range is just costing more without really providing that much more power.
Motherboard - Upgrade potential is key! Unless you're getting top of the line components, try to find a motherboard that will offer flexibility to upgrade your RAM or your processor in the future. For instance, if your AMD processor is socket AM3, think about getting an AM3+ motherboard. Research if you're going to need to upgrade to dual video cards (I will not for this build). Think about other PCI expansion cards (sound, serial ports, RAID, TV Tuner cards, etc.) you may need in the future and make sure there's enough room for them. Remember, a powerful video card will usually take up two bay spaces in a computer case and it may cover a critical PCI slot.
Hard Drives - If you can afford a solid state drive (SSD), great. They're incredibly fast, and I've even heard of people using two of those at RAID 0, which seems almost unimaginably fast in 2012. Use one of those around 100 GB or so for $100 to run your operating system and your NLE (video editing software) but you'll need at least slave drive (hopefully two, running Raid 1 for redundancy) for real storage.
Otherwise, I suggest using 2 Western Digital (Segate drives are inexpensive however they're lower quality and have had a high failure rate for my friends and I) hard drives that run at least 7200 RPM.
!Upon receiving my two WD hard drives, I found that one was dead on arrival. This goes to show that all hard drives have a failure rate (although it's quite low), but it illustrates how important RAID 1 and other data redundancy strategies are. See my upcoming post on building a building a DIY video editing computer for more information on this hard drive failure.
Run them together using Raid 0 for increased efficiency and speed. This means that the computer will treat them as one hard drive, but it can write to both at the same time; thus it can write twice the information at once.
Video Card - A video card is essentially a mini computer with its own processor and memory whose sole function is to process and output video to a monitor. Whenever possible, use a video card that is not built into the motherboard. These are easier to upgrade, and using video card that is separate from the motherboard will divert the processing load of rendering video away from the CPU so your main processor can concentrate on running your operating system and NLE.
I've been thinking about the EVGA GeForce GTX 550 Ti because it's relatively inexpensive (≈$120) and it has some power to it. If you're thinking about using Adobe Premier with this card, you will need to alter a registry file to unlock these non-supported video cards to be able to use non-supported graphics card properly (check out a list of supported graphics cards for CS6).
I've read recommendations to use the GTX 460 (identical to the GTX560, but cheaper) with your intro video editing workstation.
If you have the money (starting around $250-300), use Adobe's list of supported graphics cards as a guide to begin selecting your video card.
Check out the Videoguys' blog (heavy on Intel suggestions) and Tom's Hardware and for some more discussion on building a video editing workstation. I disagree with having to rely on Intel processors, but I'm a spatial analyst, not a video professional, and I haven't tried it for myself yet. Intel is the industry standard, but they can be significantly more expensive. I finished my custom build for just over $1,000 (closer to $1,100 after building the case and adding a few parts like lighting and a hard drive rack)
2) You need a flat lens to shoot with a GoPro underwater
! As of October 17, 2012, the new GoPro Hero3 series waterproof cases come with flat lens standard, negating the need for additional equipment.
For the same reason that humans need a mask to see properly under water, the GoPro Hero & Hero2 cameras standard curved lens produces a blurred, unfocused image under water. High end camera housings have precisely aligned hardware that overcome this problem. The GoPro simply needs a mask (a flat lens and an air space between the water and the camera) to make full use of the HD capabilities.
Since GoPro finally released their version (I waited almost two years for the official GoPro Dive Housing), I would recommend their flat lens housing, however there are a number of options available to overcome this problem (don't forget, you can make your own):
• Official / guaranteed (to a point)
• Fair price
• No vignetting at any resolution (although some of my photos have slight shading around the corners which I don't mind)
• Looks awesome/professional
• Rated to ≈200'
• Currently no official red/cyan filter
• I've heard any of these housings can begin to crack/leak around 140' so I'd recommend considering an insurance plan to help cover it for any deep(>100')/deco diving
• Removable filters (red/UV/polarizing/etc.) that fit standard camera lens sizes
• Looks good/professional
• Comes with replaceable desiccant balls in the lens to absorb moisture (rad idea!), keeping the lens free of "fog" on the inside
• A bit expensive
• Tested to 130' - it's important to have a buffer. 200-300' is preferred for 100' diving
• Vignetting @ 960p
• Pressure tested to 180' (same ballpark as official version)
• Looks good. Solid.
• Adapter for filters
• No reflection issues
• Super expensive
• Filters not included (dumb)
3) Choosing video editing and conversion software
! Windows Movie Maker will NOT edit video straight from a GoPro or most other HD video cameras without a format conversion.
GoPro and other cameras that shoot HD video in a highly compressed video format called H.264. The file format that the user will be most familar with is .mp4 or .mov which is more of a container than the actual format, but don't worry about that. Read more about the H.264 codec or just assume that this HD video format allows high quality video to stream very efficiently over the Internet. Examples are Flash video (YouTube, Vimeo, Google's video chat), iTunes content, broadcast television, cable & satellite TV, etc.
In the same way that a computer needs specific software to display an image, play an MP3, or compose a text document, you need special software to be able to read (decode & uncompress) the .mp4 (MPEG-4 / H.264) format. Thankfully most operating systems come with a player built in to read this format, but sometimes you have to go download Quicktime / VLC to use as video players. Otherwise you may need to just download a codec or update your current software (like Windows Media Player, etc.) to view video that you shot.
Editing video is another story. Most video editing software cannot edit the MP4/H.264 that the GoPro/Canon/Nikon shoot for video, so it is often necessary to convert the video to something your computer can handle natively. GoPro offers their own software package for free called CineForm Studio that will convert your video or stitch together your time lapse into .AVI or .MOV file formats, then it'll allow you to do some basic editing, trimming, and color correction.
Otherwise, I suggest using another free tool called Format Factory. It let's you easily convert anything to anything. Seriously. It's fantastic. It does a very good job of converting video between compressed (.mp4 /.mov) and uncompressed (.wmv / .avi / .mov) formats without loosing too much quality. You can also choose to reduce the quality and save some space and processing power if necessary.
Easily convert between video formats using Format Factory
From here there are a few paths you can take on your way to begin trimming the ends of your video, stitching clips together, and overlaying music and adding effects to your movies.
Free - Go low budget. Convert your video and reduce the quality a bit and use Windows Movie Maker. As long as you your computer can handle the video you throw at it (or you are close to finding nirvana in your meditation sessions), WMM is actually pretty effective. Forget have much control over placing text or other visual layers/objects over your video, though.
! Update: Adobe just released a free copy of CS2 for download - no strings attached! That's a free copy of Premiere (video editing), Photoshop (raster graphics), Illustrator (vector graphics), and more. It's somewhat dated, but much of the most powerful functionality you can expect to use today is available. This can be a great tool to learn how to use this software.
Another higher end free option is Lightworks: an open source, professional NLE. I've heard that some of the more powerful tools are only available for purchase. I have yet to try the free/light version.
Under $2000 - Get a Mac and use iMovie. You're paying way too much, but they're great quality and you will definitely get what you pay for with Macs; you'll be happy. Also, no additional assembly required!
Over $2000 - Invest thousands in a serious work station, GPU video cards, and use Adobe Creative Suite or Final Cut Pro
4) Choosing photo editing software
I highly recommend using Google Picasa for intro photo editing. The software is free, powerful, and highly organized. It's great if you're a beginner with no knowledge of photo editing, all the way up to playing with impressive image touch-up tools, color adjustments, fun filters, and photo grids/collages.
Free, powerful photo editing software
Further, if you're interested in working your way up to more powerful software packages - like GIMP(also free), Photoshop, etc. - Picasa is great introductory package that provides an easy to use playground to begin learning about what goes into digital image correction, enhancement, and processing - essentially, how to make your photos pop. 5) Image processing techniques
Watch the video above for a demo of what the software can do, but the following is the general process I use to process an image taken out on one of my adventures. The screenshots below correspond to Picasa version 3.9.
Basic fixes: Straighten the image! A grid is overlaid for reference. Make sure your horizon or your subject are aligned properly using the slider bar.
Remove any red eyes.
If there is minimal backscatter or any other unsightly spots that you would like to "photoshop" out of the image, use the Retouch tool to replace unwanted marks/areas across an image - similar to a clone tool. Anything from a blemish on someone's face to a shadow of the camera creeping into a shot, to an annoying kid in the background can be quickly removed with the Retouch tool.
Crop out excess scenery if it takes emphasis off of the subject. I am a fan of using the background as the main subject, but a busy shot can take the focus away from fine detail on a reef or an interesting formation, etc.
Begin with basic fixes and touch-ups
Tune the image and illuminate the scene:
Adjust the Fill Light, Hilights, Shadows, Color Temperature, and (especially for underwater photography) apply a Neutral Color adjustment. Start by using the magic wand button (aka "I'm feeling lucky button") to see what the software thinks will make the image look best (basically, an algorithm attempts to normalize the distribution on the histogram by adjusting these settings). Feel free to undo that statistical guess and/or make further adjustments until you're happy. You can always undo all edits and start over.
Use "Tuning" controls to bring out some missed detail
Fill Light - Controls the overall brightness of an image. Be careful if there are many areas that are already bright or there is a high contrasts between the bright areas and darker sections that are being illuminated with this control, as the bright areas can quickly become overexposed. This shifts color values to the right side of the histogram. Highlights - Increases the range between bright and dark colors, making a richer, vivid image. This shifts the span of color space beyond the upper bounds of the histogram, potentially overexposing certain images. Shadows - Amplify the dark areas -- often representing shadows -- across an image. The color space is shifted beyond the lower bounds of this histogram; inverse to the method used on the Highlights control. Color Temperature - Tune a warmer (more red) or cooler (more blue) tone to the image. Moving the slider to the right (warmer/red) compresses the color distribution on the histogram. Moving to the left (cooler/blue) expands the colors Neutral Color Picker - Select which spot is the "whitest" and the image is adjusted accordingly. This is especially important when filming underwater where the color spectrum is reduced. A blue or green tint is guaranteed to be present at any depth without the use of significant lighting. This is this post-production version of adding a red filter to a camera rig and is a very easy way to restore a natural appearance to a significantly green/blue image. You might need to Undo this and select a few different spots on the image until you are satisfied. Use this along the Color Temperature slider for further adjustment.
Adjust the texture of an image:
There are a few specific tools out of the 36 total processing tools on the last three tabs that can adjust the focus and bring out shapes like fish that are hiding behind poor visibility in the water. Sharpen or Soften the texture using these tools on tabs 3 & 5, respectively.
Applying a touch of the "HDR-ish" tool on tab 4 can really help bring out the texture of a reef or a fish through poor underwater visibility. Further, it gives a unique, highly processed look to a photo with vivid colors. Read more about the High Dynamic Range photography if you're interested.
The last three tabs are a variety of 36 different filters and fun effects
Adjust the colors... again:
Now that your image has an improved color balance and texture, you can further process the photo to really make it pop. Here are a few of my favorite filters:
Graduated Tint (at the bottom right of tab 3) - Use this especially for beach shots or photographs where the sky is present to give the sky a more rich color that may be washed out from excess light on a bright day, or from a slightly overcast sky. This tool will apply a selectable color tint to the top portion of the image and it will gradually fade into the natural color of the rest of the image. Turn the
Boost (on tab 5) - This tool is great for emphasizing rich colors across the image. Move the slider all the way to the left and experiment with adding small amounts of this tool at a time. Just a touch can be plenty.
If necessary, finish with a wild filter:
Play around with any of the other filters. Especially for underwater photography, consider a standard black & white photo for deep dives where shades of blue are essentially the only color that will be observed. I find it difficult to view a rich blue photo changed to black and white, so consider applying the black & white filter early in the processing, and move on to another photo. Come back when your eyes will be fresh and your retinas can readjust to a colorless image.
Additionally, play with Focal B&W to zero-in on a vivid color to highlight.
The 1960's filter gives an image a softer photo with some interesting yellows and greens (which looks great on beach shots with some bright, overexposed areas against a lot of water).
For underwater shots, adding a Vignette, or using a filter with a shaded/darkened border can give a tunnel vision effect, giving the feeling of wearing a mask underwater if the image is in landscape orientation (wide, rather than tall). Be sure to think about how the image is Cropped to focus the attention on a specific object like a fish or a shell in the center of the image.
Practice!
There's no single correct answer to creativity. Apply these fixes and filters to a series of pictures. Try to make a series of photos flow well with each other by attempting to match color schemes over a few photos. Try transitioning from a very natural looking scene to a highly processed image with wild, vivid colors across a few images as you descend on a reef.
Search galleries from other photographers online and try to recreate their work. Make a copy of your processing, and start again from scratch. Compare the same photo with different styles.
6) Camera Selection Part 1 - Do you need a GoPro? I'll ask you these questions:
Do you do cool things (don't worry if you're actually good at doing them or not)?
Would you like to see those things through a fisheye lens?
If you were to bring sensitive electronics with you while you do your things, will the electronics likely be destroyed?
Is anyone remotely interested in seeing what you do?
Do you have a Facebook/YouTube/Vimeo/Flikr/Twitter/Instagram/etc. account?
If you can answer yes to any of the above questions, you should probably get a GoPro camera. Here are some pros and cons of investing in a GoPro camera
Pros:
Cons:
• Super cool and easy to use
• Very small/light so it can fit anywhere you try to mount it
• There are lots of mounts (suction cup, head/chest/wrist/base plate/helmet/surfboard/snowboard/handlebar/rollbar mounts, etc.) that allow you to get very createive
• It can take a beating
• See the world in new ways
• High speed video mode allows you to critique your techniques in sports, etc. There used to be up to 60 fps, but the Hero3 Black has modes that shoot up to 120 fps in HD, and 240 fps in a non-HD mode!
• It's very simple to create cool time lapse videos. There are a range of rates from half a second to 60 seconds.
• It shoots amazing video, and really impressive photos. Seriously, that fish-eye lens is really cool if you've never used one before
• Wi-Fi capabilities are cool. The Wi-Fi Remote is easier to use than looking at the camera to check settings, and the higher Hero3 models can use an iPhone as a viewfinder
• The new Mic Adapter allows the use of better microphone setups. Very cool.
• Your current computer may not be powerful enough to edit video
• A flat lens is imperative to shoot underwater (scuba, etc.), but the Hero3 series come standard with a flat lens housing. Previous HD Hero & Hero2 versions require the add-on dive housing
• Get used to the fisheye effect if this is your main camera
• No flash / strobe sync
• The old LCD screen and the new touch screen are $80 add-ons. The fisheye lens provides a much wider field of view than regular cameras, so it's not absolutely imperative to use a viewfinder but it definitely helps set up shots. Also, it's a little hard to see the older LCD screen in bright sunlight (not sure if the new touch screen is improved)
• Mounts and add-ons are addicting. This can become an expensive hobby in itself, so make sure you use it
• The Original HD Hero does not perform very well in low light: the image turns to distorted pink and white hot spots. The Hero 2 is supposed to be a bit better with this
• SD card not included. I recommend at least an 8 GB class 10 card. A 4 GB fills up rapidly, but will work just fine.
• The small, light camera will shake like crazy in the water, but it can easily be mounted to a camera tray with some weight
Weigh the pros and cons of each setup. The Hero2/Hero3 Gold are additional hundred bucks more expensive than the original HD Hero/Hero3 White models, but depending on how you use them it may or may not be worth the extra cash. If you just want a sweet camera to play around with, grab a Hero3 White Edition and add some accessories later. If money is not an issue, absolutely go with the Hero2/Hero 3 Silver. You'll be happy with any of them. Be sure to do some research before you do buy and of them, though. Keep your ear to the ground for new cameras and accessories to be released. A lot of people (including small businesses) invested in the original HD Hero, then one day out of nowhere the Hero2 hit the streets. The same thing happened with the Hero3 series. I originally wrote this article in September, 2012, not knowing anything about the Hero3. A week prior to the release, they completely dropped the HD Hero 960 (see below), and dropped the price on the HD Hero. Then one night the Hero 3 series was announced, the HD Hero is gone, and the GoPro Web site doesn't mention the old products anymore. At least Apple lets you know that they're ready with a big development - and their old products don't drop out of existence.
! Here were the three options prior to October, 2012 for choosing a GoPro camera: $150 - HD Hero 960: The 960 is no longer available as of October-ish, 2012!
Shoots up to 960p (which is still really good, and is a higher resolution than I've been using for 2 years. I'm perfectly happy shooting 720p. 1080p not included
5MP photos
Does not shoot 60 frames per second. I really like the high speed video for slowing down action sports.
No bus port for add-ons like a bigger battery pack/LCD back plate/WiFi accessory/3D/etc.
$200 / $130 HD Hero: The HD Hero is no longer available as of October 17, 2012
+$30 for the surf accessory kit / +$40 for the helmet kit / + $40 for the motorsports kit (the suction cup mount is amazingly strong!
Shoots 1080p / 960p / 720p HD HD video
5MP photos
Shoots high speed video (60 fps) @ 720p
Bus port included for expansion packs
$300 - HD Hero2 (includes selected accessory kits):
Improved lens
Improved image processor
Is said to do better in low light
11MP photos
7) Camera Selection Part 2 - Consider a point & shoot with a housing For the amount of money you'll drop on a GoPro rig (camera + LCD backplate + dive housing + mounting accessories = at least $300 to $400), you should consider a simple Canon point & shoot camera with matching housing. Most Canon point & shoots have a good, dedicated "underwater mode" that automatically adjusts the white balance for blue/green saturation, while still giving plenty of room for manual control. I suggest browsing the features and comparing a few different cameras and find a matching Canon or Ikelite underwater housing.
Canon PowerShot ELPH 100HS
After much research and consideration, I chose the Canon PowerShot ELPH 100 HS with the Canon WP-DC39housing. This camera shoots unbelievably rich video up to 1080p, and takes beautiful stills @ 12.1 megapixels. There is a lot of control over white balance, ISO selection, shutter speed (long exposures can be set to anywhere between 1 & 15 seconds). Additionally I was pleased with a few other technical specifications, and the amount of built in effects and filters.
Canon WP-DC39 waterproof housing for the ELPH 100HS
After comparing the cameras in the ELPH series, I decided that the higher costs of the newer models did not justify the slight improvements. I am extremely happy with the quality of photos, video, and with the control the camera gives me to shoot. Although the Ikelite digital camera housings are a bit more expensive, they may give a user more control over all of the buttons for a supported camera that may not be available on the Canon version. Compare the back of the Canon WP-DC39 (this image is another model, but the DC39 looks almost identical) with the Ikelite 6243.01 housing. I was able to find the Canon housing for around $80 cheaper. While the Canon housing does not have full control over every button, thus every setting on the camera, I still have significant control over custom exposure settings (most important). Using the Canon housing, a user is limited to three modes:
Automatic - though manual controls are still available
Beach - designed for bright, sunny scenes over highly reflective surfaces (sand/glare)
Underwater - rapid white balance, which does a great job at removing blue/green overtones
Although the built in effects filters are really impressive, they're 90% useless while scuba diving. Many of those effects can be recreated in post-production, anyway. The dedicated underwater setting with manual controls are far more effective in capturing the best image possible. I am absolutely thrilled with what I've shot so far and have not fully met this camera's potential. I could use a more powerful video light with a wider beam. I'm currently using a hand mounted Intova Ultra Nova 220 lumen LED in the video below, which is bright, but it has a tight beam and a limited cone which isn't great for shooting video. Additionally, I would like to invest (will probably just build) a stronger underwater tripod. I'm currently using the Joby Original Gorillapod, however the legs are not quite strong enough to make me completely happy. It's a great tool, but the camera housing is a bit too large to make the small tripod 100% effective. I would suggest a larger version, or build your own mount. One additional item that would help would be weights and a tray to hold the camera while shooting underwater. The camera is almost completely neutrally buoyant (just slightly negative so it sinks), so additional weight would help stabilize shooting long exposure photos in a cave, and a heavy tray would minimize shaking during moving shots (video especially) into a flowing spring or current. I'll end with a couple basic some samples of what I've shot so far with my Canon ELPH 100 HS rig: Freediving Wakulla Springs(click to enlarge the images):Cavern dive at Jackson Blue Spring: