Various sizes of aluminum (top rows) and steel
cylinders (bottom rows, with black tank boots)
Scuba cylinders come in a wide range of sizes, colors, and material; each of which can be used for a variety of diving conditions, although certain types of diving may require a more specific type of cylinder. Some issues include selecting a tank to hold primary gas for recreational diving, backup gas for extended range diving, extra bottles for special mixes for deep diving ("bottom gas") or decompression, or even specifically for non-breathing/inflation purposes only. Beyond size alone, scuba tanks can have different buoyancy characteristics, making cylinder choice an important consideration for a given dive.
Cylinder Types:
Scuba cylinders are made from alloys of either aluminum or steel:
Aluminum cylinders are generally less expensive and lighter than steel cylinders. Rental tanks are commonly aluminum 80's ("AL80's") which means that the cylinder holds about 80 cubic feet of gas at its working pressure of 3000 psi. Some dive charters use smaller AL72's to limit divers' bottom time. Decompression bottles (usually in the ballpark of AL40's) are light weight and streamlined. Smaller cylinders like AL13-19's are sometimes filed with Argon and are used solely to inflate a drysuit (better thermal protection than air/nitrox).
Aluminum cylinders are flat on the bottom and can stand up without a plastic boot. A boot will help protect the cylinder from scratches, however it will also trap water and debris so it is important to rinse cylinders with a boot thoroughly after diving in salt water or silty, sandy conditions.
AL80's are a great investment for open water and cavern divers who are buying their first cylinder(s). The cost-to-volume ratio is great, and they aren't too difficult to transport to- and around a dive site, although they may be a bit long for very short divers. An AL80 can give a diver enough bottom time to be limited only by their diving tables' No-Decompression Limits (NDL's). Aluminum 63's are shorter and generally more comfortable, at the cost of less gas and limited bottom time. The buoyancy characteristics of aluminum cylinders make them heavy (negative) at the beginning of a dive and become positively buoyant (float) as the cylinder empties, so a diver should plan to be slightly over weighted at the beginning of a dive to avoid kicking to stay down at 15-20' for a safety stop on a depleted tank. Naturally, aluminum cylinders do not rust, but may still corrode when exposed to contaminants such as salt water, oil, etc., forming aluminum oxide. Aluminum cylinders are more resistant to damaging amounts corrosion than rusting steel cylinders. When aluminum oxide forms it acts as a barrier, hindering further corrosion deeper into the cylinder wall.Steel cylinders come in two varieties: high pressure (3300-3500 psi) and low pressure (2400 to 2640 psi) cylinders (HP & LP, respectively). Steel cylinders are a bit more expensive to purchase new, however with proper care a steel cylinder has a virtually infinite lifespan (decades old cylinders are still in proper service today). The added weight of steel makes these cylinders negatively buoyant (heavier than water) throughout the dive, so a diver will not need as much weight than if s/he were diving a single aluminum tank. It is common for divers using doubled steel cylinders to dive without any additional weight at all. Steel cylinders usually have a round bottom which makes then unable to stand up on their own without a tank boot.
Boyle's law (relating pressure & volume) illustrates that filling a smaller space with a higher pressure allows a cylinder to be smaller than that of its lower pressure counterpart; so a HP80 steel cylinder will be a bit shorter than a common AL80. HP80 cylinders are are a breeze to dive since they're so small. Further, a HP100 is closer to the size of an AL80, although the HP100 is a bit heavier and it has the benefit of around an extra 20 cubic feet of gas; good if you are a heavy breather underwater or you plan on some fun deep dives. When filling a high pressure cylinder, be sure to identify that the cylinder's working pressure is higher than 3000 psi to take advantage of the cylinder's full volumetric potential. A 3000 psi fill on an HP100 is only 85.7 ft³ - significantly less than its rated 100 cubic feet of breathing gas. A low pressure cylinder, on the other hand has a working pressure of 2400 psi. During the first five years of use the cylinder can be filled to 10% over this working pressure to 2640 psi, but this is negated after the cylinder's first hydrostatic pressure test servicing (five years from the original factory hydrostatic test stamp date). Although it is not sanctioned, some fill stations will give a "cave fill" to a low pressure cylinder: filling the cylinder beyond its rated working pressure, giving the the cylinder a capacity to hold a higher volume of gas than it is rated to hold. High pressure steel, and aluminum cylinders cannot be overfilled in this same manor.
For example: A LP95 holds 95 cubic feet of gas @ 2640 psi. A cave fill to 3500 psi gives the cylinder 125.9 ft³. Double LP95's (190 ft³ @ 2640 psi) with a cave fill contain 252 ft³ of gas.
Dimensions:
An illustration of scuba cylinder size vs. its filled contents.
Here, a model stands next to an eighty 1 ft³ boxes, and
an aluminum 80 scuba cylinder.
Click image to enlarge View a text version of this chart (Google Docs/Drive)
Chart recreated via Laymon, Lynn. "A Tank is a Tank." Dive Training Magazine November 2004
K-valve - This is currently the standard, and most common configuration of a valve used by many cylinders which requires only one first stage regulator. The on/off handle is located on the valve's right side (the left side of the picture, as the valve is facing the camera. Comparatively, your right hand that you will use to operate the valve when wearing your gear will be on your friend's left if you are facing each other), and the burst disk will usually be located on the left side or in the back of the valve. The valve stem is located below the threads on the bottom of the valve. This extends further into the cylinder and acts as a straw: if any liquid were to be contained inside the cylinder, this stem would restrict it from being blown into a regulator when a diver is upside down in the water. This is why it's important to inspect your cylinder annually.
K-valve with a yoke fitting
J-valve - Here is an older style valve that is similar to a K-valve, except there is an additional knob on the diver's left side. When the pressure in the cylinder is low (around 300-500 psi), this valve will start to act as if it were empty, by restricting the flow of gas to its regulator. Turning this secondary knob opens a mechanism in the valve to deliver the remaining gas to a diver, thus warning a diver that the cylinder is almost empty if a submersible pressure gauge is not being used (not recommended - this was just old technology).
J-valve with a removable DIN-to-yoke insert
H-valve -An H-valve is used on a single cylinder with two independent fist stage regulators, with a single octo attached to each. Using two regulators with this valve gives a diver a degree of redundancy: if one first or second stage regulator malfunctions and begins uncontrollably free-flowing or freezes over, the gas supply can be completely shut off while the second regulator set continues to receive gas from the tank and deliver breathing gas to the diver.
H-valve with a valve plug, detached valve stem,
and two DIN-to-yoke conversion plugs
This configuration is recommended for Intro Cave, Decompression, and other technical divers who are not using doubles. This is a common configuration, however the inverse configuration is also popular: where the H-adapter will simply connect to the other side of the main valve. The right post configuration above will not work with parts from a left post H-valve. H-valves can be converted to a K-valve by draining the cylinder (0 psi/bar), unscrewing and removing the H-adapter portion, and replacing the adapter with a valve plug (shown in the lower right of the photo above). Another name for this is a "modular valve." Note the thicker, longer portion of the valve that connects the H-adapter in relation to the K-valve in the previous image. This is much stronger which allows a second regulator to be safely connected to the very high pressures contained in the cylinder. Further, a right- and left- H-valve can be connected together by replacing the H-adapter valves with an isolator valve (see below).
Isolator valve - A mechanism that connects two cylinder valves together is called an isolator valve or a crossbar (no valve). This valve gives a diver the option of shutting off the connection between the two tanks, thus isolating their gas supplies independently in an emergency, offering a high degree of control and redundancy. Connecting two valves together with an isolator valve is called a "manifold."
Isolator valve
If one of a diver's first or second stage regulators fail, that regulator's valve can be shut off while still giving a diver access to breathing gas both cylinders via the backup regulator. Gas will pass through the isolator valve to the working regulator. If a leak develops that remains uncontrolled by operating the right or left valve, the isolator valve can be closed to "isolate" or preserve gas in at least one of the non-malfunctioning cylinders.
Manifold - The common "double" cylinder configuration connects two cylinders together with a manifold, which is the combination of a "right" valve", a manifold, and a "left valve."
A manifold is a combination of a right, isolator, and left valve. Photo courtesy Cave Adventurers
Y-valve -A simplified version of the H-valve is the Y-valve, which allows two independent first stage regulators to be connected to a single cylinder. This configuration cannot be combined with any other type of valve or cylinder.
DIN K-valve with a removable yoke insert. Photo courtesy AquaViews.net
Scuba regulators attach to cylinder valves in one of two ways
A yoke regulator fits over a valve and is held in place when the regulator is pressurized.
A DIN regulator screws into a valve and is held in place with threads that are tightened further when the regulator is pressurized.
A yoke-based regulator is usually less expensive and is great for open water diving. When you begin to dive overhead environments or use high concentrations of oxygen (above 40%), it becomes important to use a regulator with a DIN fitting since DIN valves are less likely to become dislodged from the cylinder; above or below the surface.
Converting between the two usually only goes one way. A DIN-to-yoke adapter can be attached to a DIN regulator to fit a yoke cylinder.
Some yoke regulators have a conversion kit (which are usually pretty expensive for some reason) where the A-clamp can be completely replaced with a new DIN fitting.
Painting / finishing:
There are a number of reasons why painting a scuba cylinder is a bad idea.
Scratches or chips in paint or other finishing coatings allows water to become trapped between the metal of the cylinder and the coating itself. This can quickly lead to rust or corrosion of the cylinder
Stickers can trap water against the cylinder as well. Whenever possible, use small stickers, and avoid large stickers as tank wraps. Mesh warps are acceptable, as water does not become trapped against the cylinder, and the plastic sleeve provides a degree of scratch/clanking protection
Using heat to cure paint onto metal cylinders will weaken the metal and become an extremely dangerous hazard. Never use heat in any part of a painting process
Paint covers corrosion and damage. Some scuba shops/filling stations will refuse to fill an after-market painted cylinder
In order for a cylinder to pass annual visual inspection, the surface must be free of after-market paint and decals
There's a dilemma I have with this issue. On the one hand, diving
shouldn't be about looking super cool. On the other hand, if you're
spending hundreds of dollars on expensive equipment, you might as well
invest in something that makes you happy every time you see it.
Certainly, a shot-blasted or brushed aluminum tank isn't as flashy as a
red one, but it'll get the job done. For full disclosure, I purchased
two candy apple red, glossy coated Aluminum 80's for my first set of
tanks, and my girlfriend bough pink tanks! Our technical gear are
shot-blasted double steel 95's, and she has a single white steel 95s
with some very small stickers for decoration and a pink tank mesh.
I'm a tech savvy, outdoorsy, surfer/scuba diver/swimmer/water enthusiast, and I am creative enough to want to start making videos and shooting photos of my favorite outdoor activities. I decided to invest in a GoPro HD Hero a few years ago. Here's what I have learned since then.
!Feel free to browse the main points since this is such a long article:
You need a high end computer to edit high end video
You need a flat lens to shoot with a GoPro underwater
Choosing video editing and conversion software
Choosing photo editing software
Image processing techniques
Camera Selection Part 1 - Do you need a GoPro?
Camera Selection Part 2 - Consider a point & shoot with a housing
1) You need a high end computer to edit high end video:
Having seen friends transfer their camcorder video to their laptops and stitch some movies together in the past (several years ago), I figured that I might only have a little lag and jumpy playback to endure while editing. I was completely wrong. Even after shooting 720p video (great, but reduced quality) and further converting it to a reduced format and resolution, my video editing software (a.k.a. Non-Liner Editing system, or simply an "NLE") would simply crash after shortly after I added any of the video files to a project. Thinking harder about those videos my friends produced, the size of the videos were always pretty small.
If you plan to invest in a camera, make sure you have a computer that can handle editing high definition video. Otherwise, be prepared to upload full clips directly to YouTube, etc. Be advised that I will immediately down-vote and close your video if the clip begins and ends with you fiddling with the camera. Some form of basic editing is a must - it doesn't take much.
I'm in the process of building a computer that will hopefully be able to handle editing 1080p video. Here are some recommendations:
CPU - The Intel Core i7 series is currently the industry standard, but it comes with a high price. The i5 line is known to get you by.
I'm interested in trying to go with an AMD processor for around $100 less. A great AMD processor seems to be the Phenom II X6 1090t. It has six cores running @ 3.2 GHz. Very fast.
RAM - Memory is relatively inexpensive and the costs will continue to decline. Start with at least 8 GB (if not 12 or 16 GB) if you're looking into a new machine. Make sure your motherboard can upgrade to 32 gigs for future upgrades, but 8-16 gigs will get you started. Shoot above the mid-point of the frequency rating for the motherboard's supported ram speed. 1600-1800 MHz should be plenty of speed for a while; moving into the 2000 MHz range is just costing more without really providing that much more power.
Motherboard - Upgrade potential is key! Unless you're getting top of the line components, try to find a motherboard that will offer flexibility to upgrade your RAM or your processor in the future. For instance, if your AMD processor is socket AM3, think about getting an AM3+ motherboard. Research if you're going to need to upgrade to dual video cards (I will not for this build). Think about other PCI expansion cards (sound, serial ports, RAID, TV Tuner cards, etc.) you may need in the future and make sure there's enough room for them. Remember, a powerful video card will usually take up two bay spaces in a computer case and it may cover a critical PCI slot.
Hard Drives - If you can afford a solid state drive (SSD), great. They're incredibly fast, and I've even heard of people using two of those at RAID 0, which seems almost unimaginably fast in 2012. Use one of those around 100 GB or so for $100 to run your operating system and your NLE (video editing software) but you'll need at least slave drive (hopefully two, running Raid 1 for redundancy) for real storage.
Otherwise, I suggest using 2 Western Digital (Segate drives are inexpensive however they're lower quality and have had a high failure rate for my friends and I) hard drives that run at least 7200 RPM.
!Upon receiving my two WD hard drives, I found that one was dead on arrival. This goes to show that all hard drives have a failure rate (although it's quite low), but it illustrates how important RAID 1 and other data redundancy strategies are. See my upcoming post on building a building a DIY video editing computer for more information on this hard drive failure.
Run them together using Raid 0 for increased efficiency and speed. This means that the computer will treat them as one hard drive, but it can write to both at the same time; thus it can write twice the information at once.
Video Card - A video card is essentially a mini computer with its own processor and memory whose sole function is to process and output video to a monitor. Whenever possible, use a video card that is not built into the motherboard. These are easier to upgrade, and using video card that is separate from the motherboard will divert the processing load of rendering video away from the CPU so your main processor can concentrate on running your operating system and NLE.
I've been thinking about the EVGA GeForce GTX 550 Ti because it's relatively inexpensive (≈$120) and it has some power to it. If you're thinking about using Adobe Premier with this card, you will need to alter a registry file to unlock these non-supported video cards to be able to use non-supported graphics card properly (check out a list of supported graphics cards for CS6).
I've read recommendations to use the GTX 460 (identical to the GTX560, but cheaper) with your intro video editing workstation.
If you have the money (starting around $250-300), use Adobe's list of supported graphics cards as a guide to begin selecting your video card.
Check out the Videoguys' blog (heavy on Intel suggestions) and Tom's Hardware and for some more discussion on building a video editing workstation. I disagree with having to rely on Intel processors, but I'm a spatial analyst, not a video professional, and I haven't tried it for myself yet. Intel is the industry standard, but they can be significantly more expensive. I finished my custom build for just over $1,000 (closer to $1,100 after building the case and adding a few parts like lighting and a hard drive rack)
2) You need a flat lens to shoot with a GoPro underwater
! As of October 17, 2012, the new GoPro Hero3 series waterproof cases come with flat lens standard, negating the need for additional equipment.
For the same reason that humans need a mask to see properly under water, the GoPro Hero & Hero2 cameras standard curved lens produces a blurred, unfocused image under water. High end camera housings have precisely aligned hardware that overcome this problem. The GoPro simply needs a mask (a flat lens and an air space between the water and the camera) to make full use of the HD capabilities.
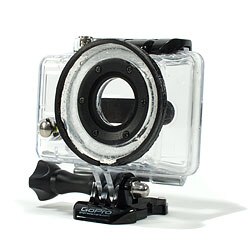
Since GoPro finally released their version (I waited almost two years for the official GoPro Dive Housing), I would recommend their flat lens housing, however there are a number of options available to overcome this problem (don't forget, you can make your own):
• Official / guaranteed (to a point)
• Fair price
• No vignetting at any resolution (although some of my photos have slight shading around the corners which I don't mind)
• Looks awesome/professional
• Rated to ≈200'
• Currently no official red/cyan filter
• I've heard any of these housings can begin to crack/leak around 140' so I'd recommend considering an insurance plan to help cover it for any deep(>100')/deco diving
• Removable filters (red/UV/polarizing/etc.) that fit standard camera lens sizes
• Looks good/professional
• Comes with replaceable desiccant balls in the lens to absorb moisture (rad idea!), keeping the lens free of "fog" on the inside
• A bit expensive
• Tested to 130' - it's important to have a buffer. 200-300' is preferred for 100' diving
• Vignetting @ 960p
• Pressure tested to 180' (same ballpark as official version)
• Looks good. Solid.
• Adapter for filters
• No reflection issues
• Super expensive
• Filters not included (dumb)
3) Choosing video editing and conversion software
! Windows Movie Maker will NOT edit video straight from a GoPro or most other HD video cameras without a format conversion.
GoPro and other cameras that shoot HD video in a highly compressed video format called H.264. The file format that the user will be most familar with is .mp4 or .mov which is more of a container than the actual format, but don't worry about that. Read more about the H.264 codec or just assume that this HD video format allows high quality video to stream very efficiently over the Internet. Examples are Flash video (YouTube, Vimeo, Google's video chat), iTunes content, broadcast television, cable & satellite TV, etc.
In the same way that a computer needs specific software to display an image, play an MP3, or compose a text document, you need special software to be able to read (decode & uncompress) the .mp4 (MPEG-4 / H.264) format. Thankfully most operating systems come with a player built in to read this format, but sometimes you have to go download Quicktime / VLC to use as video players. Otherwise you may need to just download a codec or update your current software (like Windows Media Player, etc.) to view video that you shot.
Editing video is another story. Most video editing software cannot edit the MP4/H.264 that the GoPro/Canon/Nikon shoot for video, so it is often necessary to convert the video to something your computer can handle natively. GoPro offers their own software package for free called CineForm Studio that will convert your video or stitch together your time lapse into .AVI or .MOV file formats, then it'll allow you to do some basic editing, trimming, and color correction.
Otherwise, I suggest using another free tool called Format Factory. It let's you easily convert anything to anything. Seriously. It's fantastic. It does a very good job of converting video between compressed (.mp4 /.mov) and uncompressed (.wmv / .avi / .mov) formats without loosing too much quality. You can also choose to reduce the quality and save some space and processing power if necessary.
Easily convert between video formats using Format Factory
From here there are a few paths you can take on your way to begin trimming the ends of your video, stitching clips together, and overlaying music and adding effects to your movies.
Free - Go low budget. Convert your video and reduce the quality a bit and use Windows Movie Maker. As long as you your computer can handle the video you throw at it (or you are close to finding nirvana in your meditation sessions), WMM is actually pretty effective. Forget have much control over placing text or other visual layers/objects over your video, though.
! Update: Adobe just released a free copy of CS2 for download - no strings attached! That's a free copy of Premiere (video editing), Photoshop (raster graphics), Illustrator (vector graphics), and more. It's somewhat dated, but much of the most powerful functionality you can expect to use today is available. This can be a great tool to learn how to use this software.
Another higher end free option is Lightworks: an open source, professional NLE. I've heard that some of the more powerful tools are only available for purchase. I have yet to try the free/light version.
Under $2000 - Get a Mac and use iMovie. You're paying way too much, but they're great quality and you will definitely get what you pay for with Macs; you'll be happy. Also, no additional assembly required!
Over $2000 - Invest thousands in a serious work station, GPU video cards, and use Adobe Creative Suite or Final Cut Pro
4) Choosing photo editing software
I highly recommend using Google Picasa for intro photo editing. The software is free, powerful, and highly organized. It's great if you're a beginner with no knowledge of photo editing, all the way up to playing with impressive image touch-up tools, color adjustments, fun filters, and photo grids/collages.
Free, powerful photo editing software
Further, if you're interested in working your way up to more powerful software packages - like GIMP(also free), Photoshop, etc. - Picasa is great introductory package that provides an easy to use playground to begin learning about what goes into digital image correction, enhancement, and processing - essentially, how to make your photos pop. 5) Image processing techniques
Watch the video above for a demo of what the software can do, but the following is the general process I use to process an image taken out on one of my adventures. The screenshots below correspond to Picasa version 3.9.
Basic fixes: Straighten the image! A grid is overlaid for reference. Make sure your horizon or your subject are aligned properly using the slider bar.
Remove any red eyes.
If there is minimal backscatter or any other unsightly spots that you would like to "photoshop" out of the image, use the Retouch tool to replace unwanted marks/areas across an image - similar to a clone tool. Anything from a blemish on someone's face to a shadow of the camera creeping into a shot, to an annoying kid in the background can be quickly removed with the Retouch tool.
Crop out excess scenery if it takes emphasis off of the subject. I am a fan of using the background as the main subject, but a busy shot can take the focus away from fine detail on a reef or an interesting formation, etc.
Begin with basic fixes and touch-ups
Tune the image and illuminate the scene:
Adjust the Fill Light, Hilights, Shadows, Color Temperature, and (especially for underwater photography) apply a Neutral Color adjustment. Start by using the magic wand button (aka "I'm feeling lucky button") to see what the software thinks will make the image look best (basically, an algorithm attempts to normalize the distribution on the histogram by adjusting these settings). Feel free to undo that statistical guess and/or make further adjustments until you're happy. You can always undo all edits and start over.
Use "Tuning" controls to bring out some missed detail
Fill Light - Controls the overall brightness of an image. Be careful if there are many areas that are already bright or there is a high contrasts between the bright areas and darker sections that are being illuminated with this control, as the bright areas can quickly become overexposed. This shifts color values to the right side of the histogram. Highlights - Increases the range between bright and dark colors, making a richer, vivid image. This shifts the span of color space beyond the upper bounds of the histogram, potentially overexposing certain images. Shadows - Amplify the dark areas -- often representing shadows -- across an image. The color space is shifted beyond the lower bounds of this histogram; inverse to the method used on the Highlights control. Color Temperature - Tune a warmer (more red) or cooler (more blue) tone to the image. Moving the slider to the right (warmer/red) compresses the color distribution on the histogram. Moving to the left (cooler/blue) expands the colors Neutral Color Picker - Select which spot is the "whitest" and the image is adjusted accordingly. This is especially important when filming underwater where the color spectrum is reduced. A blue or green tint is guaranteed to be present at any depth without the use of significant lighting. This is this post-production version of adding a red filter to a camera rig and is a very easy way to restore a natural appearance to a significantly green/blue image. You might need to Undo this and select a few different spots on the image until you are satisfied. Use this along the Color Temperature slider for further adjustment.
Adjust the texture of an image:
There are a few specific tools out of the 36 total processing tools on the last three tabs that can adjust the focus and bring out shapes like fish that are hiding behind poor visibility in the water. Sharpen or Soften the texture using these tools on tabs 3 & 5, respectively.
Applying a touch of the "HDR-ish" tool on tab 4 can really help bring out the texture of a reef or a fish through poor underwater visibility. Further, it gives a unique, highly processed look to a photo with vivid colors. Read more about the High Dynamic Range photography if you're interested.
The last three tabs are a variety of 36 different filters and fun effects
Adjust the colors... again:
Now that your image has an improved color balance and texture, you can further process the photo to really make it pop. Here are a few of my favorite filters:
Graduated Tint (at the bottom right of tab 3) - Use this especially for beach shots or photographs where the sky is present to give the sky a more rich color that may be washed out from excess light on a bright day, or from a slightly overcast sky. This tool will apply a selectable color tint to the top portion of the image and it will gradually fade into the natural color of the rest of the image. Turn the
Boost (on tab 5) - This tool is great for emphasizing rich colors across the image. Move the slider all the way to the left and experiment with adding small amounts of this tool at a time. Just a touch can be plenty.
If necessary, finish with a wild filter:
Play around with any of the other filters. Especially for underwater photography, consider a standard black & white photo for deep dives where shades of blue are essentially the only color that will be observed. I find it difficult to view a rich blue photo changed to black and white, so consider applying the black & white filter early in the processing, and move on to another photo. Come back when your eyes will be fresh and your retinas can readjust to a colorless image.
Additionally, play with Focal B&W to zero-in on a vivid color to highlight.
The 1960's filter gives an image a softer photo with some interesting yellows and greens (which looks great on beach shots with some bright, overexposed areas against a lot of water).
For underwater shots, adding a Vignette, or using a filter with a shaded/darkened border can give a tunnel vision effect, giving the feeling of wearing a mask underwater if the image is in landscape orientation (wide, rather than tall). Be sure to think about how the image is Cropped to focus the attention on a specific object like a fish or a shell in the center of the image.
Practice!
There's no single correct answer to creativity. Apply these fixes and filters to a series of pictures. Try to make a series of photos flow well with each other by attempting to match color schemes over a few photos. Try transitioning from a very natural looking scene to a highly processed image with wild, vivid colors across a few images as you descend on a reef.
Search galleries from other photographers online and try to recreate their work. Make a copy of your processing, and start again from scratch. Compare the same photo with different styles.
6) Camera Selection Part 1 - Do you need a GoPro? I'll ask you these questions:
Do you do cool things (don't worry if you're actually good at doing them or not)?
Would you like to see those things through a fisheye lens?
If you were to bring sensitive electronics with you while you do your things, will the electronics likely be destroyed?
Is anyone remotely interested in seeing what you do?
Do you have a Facebook/YouTube/Vimeo/Flikr/Twitter/Instagram/etc. account?
If you can answer yes to any of the above questions, you should probably get a GoPro camera. Here are some pros and cons of investing in a GoPro camera
Pros:
Cons:
• Super cool and easy to use
• Very small/light so it can fit anywhere you try to mount it
• There are lots of mounts (suction cup, head/chest/wrist/base plate/helmet/surfboard/snowboard/handlebar/rollbar mounts, etc.) that allow you to get very createive
• It can take a beating
• See the world in new ways
• High speed video mode allows you to critique your techniques in sports, etc. There used to be up to 60 fps, but the Hero3 Black has modes that shoot up to 120 fps in HD, and 240 fps in a non-HD mode!
• It's very simple to create cool time lapse videos. There are a range of rates from half a second to 60 seconds.
• It shoots amazing video, and really impressive photos. Seriously, that fish-eye lens is really cool if you've never used one before
• Wi-Fi capabilities are cool. The Wi-Fi Remote is easier to use than looking at the camera to check settings, and the higher Hero3 models can use an iPhone as a viewfinder
• The new Mic Adapter allows the use of better microphone setups. Very cool.
• Your current computer may not be powerful enough to edit video
• A flat lens is imperative to shoot underwater (scuba, etc.), but the Hero3 series come standard with a flat lens housing. Previous HD Hero & Hero2 versions require the add-on dive housing
• Get used to the fisheye effect if this is your main camera
• No flash / strobe sync
• The old LCD screen and the new touch screen are $80 add-ons. The fisheye lens provides a much wider field of view than regular cameras, so it's not absolutely imperative to use a viewfinder but it definitely helps set up shots. Also, it's a little hard to see the older LCD screen in bright sunlight (not sure if the new touch screen is improved)
• Mounts and add-ons are addicting. This can become an expensive hobby in itself, so make sure you use it
• The Original HD Hero does not perform very well in low light: the image turns to distorted pink and white hot spots. The Hero 2 is supposed to be a bit better with this
• SD card not included. I recommend at least an 8 GB class 10 card. A 4 GB fills up rapidly, but will work just fine.
• The small, light camera will shake like crazy in the water, but it can easily be mounted to a camera tray with some weight
Weigh the pros and cons of each setup. The Hero2/Hero3 Gold are additional hundred bucks more expensive than the original HD Hero/Hero3 White models, but depending on how you use them it may or may not be worth the extra cash. If you just want a sweet camera to play around with, grab a Hero3 White Edition and add some accessories later. If money is not an issue, absolutely go with the Hero2/Hero 3 Silver. You'll be happy with any of them. Be sure to do some research before you do buy and of them, though. Keep your ear to the ground for new cameras and accessories to be released. A lot of people (including small businesses) invested in the original HD Hero, then one day out of nowhere the Hero2 hit the streets. The same thing happened with the Hero3 series. I originally wrote this article in September, 2012, not knowing anything about the Hero3. A week prior to the release, they completely dropped the HD Hero 960 (see below), and dropped the price on the HD Hero. Then one night the Hero 3 series was announced, the HD Hero is gone, and the GoPro Web site doesn't mention the old products anymore. At least Apple lets you know that they're ready with a big development - and their old products don't drop out of existence.
! Here were the three options prior to October, 2012 for choosing a GoPro camera: $150 - HD Hero 960: The 960 is no longer available as of October-ish, 2012!
Shoots up to 960p (which is still really good, and is a higher resolution than I've been using for 2 years. I'm perfectly happy shooting 720p. 1080p not included
5MP photos
Does not shoot 60 frames per second. I really like the high speed video for slowing down action sports.
No bus port for add-ons like a bigger battery pack/LCD back plate/WiFi accessory/3D/etc.
$200 / $130 HD Hero: The HD Hero is no longer available as of October 17, 2012
+$30 for the surf accessory kit / +$40 for the helmet kit / + $40 for the motorsports kit (the suction cup mount is amazingly strong!
Shoots 1080p / 960p / 720p HD HD video
5MP photos
Shoots high speed video (60 fps) @ 720p
Bus port included for expansion packs
$300 - HD Hero2 (includes selected accessory kits):
Improved lens
Improved image processor
Is said to do better in low light
11MP photos
7) Camera Selection Part 2 - Consider a point & shoot with a housing For the amount of money you'll drop on a GoPro rig (camera + LCD backplate + dive housing + mounting accessories = at least $300 to $400), you should consider a simple Canon point & shoot camera with matching housing. Most Canon point & shoots have a good, dedicated "underwater mode" that automatically adjusts the white balance for blue/green saturation, while still giving plenty of room for manual control. I suggest browsing the features and comparing a few different cameras and find a matching Canon or Ikelite underwater housing.
Canon PowerShot ELPH 100HS
After much research and consideration, I chose the Canon PowerShot ELPH 100 HS with the Canon WP-DC39housing. This camera shoots unbelievably rich video up to 1080p, and takes beautiful stills @ 12.1 megapixels. There is a lot of control over white balance, ISO selection, shutter speed (long exposures can be set to anywhere between 1 & 15 seconds). Additionally I was pleased with a few other technical specifications, and the amount of built in effects and filters.
Canon WP-DC39 waterproof housing for the ELPH 100HS
After comparing the cameras in the ELPH series, I decided that the higher costs of the newer models did not justify the slight improvements. I am extremely happy with the quality of photos, video, and with the control the camera gives me to shoot. Although the Ikelite digital camera housings are a bit more expensive, they may give a user more control over all of the buttons for a supported camera that may not be available on the Canon version. Compare the back of the Canon WP-DC39 (this image is another model, but the DC39 looks almost identical) with the Ikelite 6243.01 housing. I was able to find the Canon housing for around $80 cheaper. While the Canon housing does not have full control over every button, thus every setting on the camera, I still have significant control over custom exposure settings (most important). Using the Canon housing, a user is limited to three modes:
Automatic - though manual controls are still available
Beach - designed for bright, sunny scenes over highly reflective surfaces (sand/glare)
Underwater - rapid white balance, which does a great job at removing blue/green overtones
Although the built in effects filters are really impressive, they're 90% useless while scuba diving. Many of those effects can be recreated in post-production, anyway. The dedicated underwater setting with manual controls are far more effective in capturing the best image possible. I am absolutely thrilled with what I've shot so far and have not fully met this camera's potential. I could use a more powerful video light with a wider beam. I'm currently using a hand mounted Intova Ultra Nova 220 lumen LED in the video below, which is bright, but it has a tight beam and a limited cone which isn't great for shooting video. Additionally, I would like to invest (will probably just build) a stronger underwater tripod. I'm currently using the Joby Original Gorillapod, however the legs are not quite strong enough to make me completely happy. It's a great tool, but the camera housing is a bit too large to make the small tripod 100% effective. I would suggest a larger version, or build your own mount. One additional item that would help would be weights and a tray to hold the camera while shooting underwater. The camera is almost completely neutrally buoyant (just slightly negative so it sinks), so additional weight would help stabilize shooting long exposure photos in a cave, and a heavy tray would minimize shaking during moving shots (video especially) into a flowing spring or current. I'll end with a couple basic some samples of what I've shot so far with my Canon ELPH 100 HS rig: Freediving Wakulla Springs(click to enlarge the images):Cavern dive at Jackson Blue Spring:
I want to illustrate the cost-to-power and cost-to-memory for a variety of video cards. PCPartPicker.com is an amazing tool that helps piece together a computer by comparing hardware components while directing users to the best price for each part.
I did a basic search of just video cards sorted by price. I then manually selected and copied the text straight from the browser and pasted it into a spreadsheet. Optionally, to remove the formatting go to the Edit menu and choose the Clear sub-menu and click on Formats; or paste the selection into a blank Notepad document, then re-copy and paste into the spreadsheet.
The structure of the first row (of field headings) is fine, however each record of data is spread across three rows. Notice that the rating for the first Sapphire video card is blank (E2) and its value for rating and price are on additional lines (A3 and B4, respectively).
Formatting errors occur when directly copying raw data to a spreadsheet
I wrote a simple macro to perform the hundreds of formats automatically. Here's how it works:
Cut the Rating value from A3 and paste it in cell E2
Delete row 3 since it's blank
Repeat the procedure for the Price value, then remove that row as well (remember: row 4 becomes row 3 when we deleted row 3 because it was blank)
Formatting of the this record is complete; move on to the next row of data
The following VBA code is a macro that will iterate through the spreadsheet and reformat the data appropriately onto a single line for each record. Copy and paste this into Excel's Visual Basic Editor and tweak to fit your data. All you need to do is to change the row number of the first out of place value, and change how many times the model will iterate (highlighted below).
For instance, my first error occurs on row 3. Additionally, I'll let the model run 783 times. 783 comes from the original unformatted dataset (2,350 rows) divided by 3 (the number of lines an individual record spans - which we are reducing to 1) which = 783.33. You can round up to 800 and the model will just run on blank rows. If your figure was not enough, you can simply run the model again, starting at the position of the next error (say 781), and set it to run just 4 more times to format 783 total records (+1 for the field headings in row 1 and you will end up with 784 rows total for 783 records).
Macro Code: Sub FormatVideoCards() ' Created 9/27/2012 by Justin Berke
' http://justinberke.blogspot.com
Dim i As Integer'Model position Dim j As Integer'Loop counter 'Enter row number where the first error occurs i = 3
I have multiple text documents that contain pipe delimited data (|). It would be much easier to work with if the information could be appended or otherwise combined into a single data file.
My data are currently stored as 16 individual .txt files, however it would be nice to know how to convert comma seperated data (.csv format),or any other simple text files as well. We can easily combine these using a simple, one line DOS/command prompt command.
16 data files are a nightmare.
Merge documents from a DOS/command prompt:
Click Start :: Run, type cmd and hit enter to bring up a command prompt
Use CD (Change Directory) commands to navigate to the desired working directory of your individual datasets
Use the copy command to create a new file that contains a copy of all of the datasets together. See below for syntax and examples
In English this instruction says, "copy the contents of all files in this directory of a certain file format to a new file named whatever."
Example: copy *.txt combined.txt
Command prompt view:
View of running the copy command
Output folder view:
A single, appended file is wonderful, but it'll need some minimal formatting
Remove headers stored as records:
The data are likely to have originally been exported with field names/headings in the first row.
Three individual text files with a header in the first
row that provides field names for each dataset
These will be included in the output file because the copy function appends every line of the originating datasets into a the new file.
The copy command appended the field headings
into the dataset. These will need to be removed.
Removing these can be as simple as importing the file into spreadsheet processing software, such as Excel, and manually looking through the dataset for these lines and deleting any of those rows. Of course we will leave the very first row of these alone since we will likely want one dataset header at the beginning of the file. The remaining instance will otherwise be stored as actual records and that is incorrect.
Another way is to import the dataset into a database such as MS Access and run a SQL query to remove the erroneous records:
SQL syntax: DELETE FROM[table name] WHERE[field 1 name] = "[field 1 name]" AND [field 2 name] = "[field 2 name]";
This will begin by attempting to delete rows from the table that was imported. The query is limited to records where the data in a field matches the heading. An AND statement is used to make sure it was not a coincidence that the data matched the field heading. This can be repeated for each field in the dataset if necessary. Here's an example from my data.
Example statement: DELETE FROM GWISUpdates WHERE station_id = "station_id" AND resource_type = "resource_type";


