Showing posts with label VB. Show all posts

Sunday, June 7, 2015

Make New Project Directory

I like to organize photos, videos, GIS projects, and developments projects in separate "project directories." Each project folder has the following format:
YYYY-MM-DD - Description

File Structure Example:
  • [Drive]:\
    • Development
      • 2014-10-04 - Scuba Calculators
      • 2015-06-01 - Make New Project Directory
    • GIS
      • 2012-05-14 - Whatever Project...
        • Shapefiles
        • Exports
        • From Client
        • MXDs
    • Photos
      • 2013-04-05 - Birthday in Midtown
        • Hilights
          • Edited
        • Original
      • ...
    • Videos

This is an easy way to chronologically catalog projects within their respective folders, but I'm lazy, and I hate having to look down at my task bar clock to find out what the date is, and I can't stand typing in that endless date!

Solutions Posted on GitHub

I posted all the scripts I came up with for this on my GitHub page under the Make New Project Directory repo.

Batch File

I originally tried coming up with a Batch file (.bat) to add the folder using the format I wanted. It's easy to make a predefined folder structure using CMD commands, but pulling that date style turned out to be a little tricky, so I looked elsewhere.

Python Script

I came up with a great Python script that will automatically add a folder that's named with the current date followed by XXXXDescriptionXXXX (so I could easily find and rename it further). Just double click the python file and the new project folder is added. Additionally, I repeated the code to add subdirectories for common sub-folders: Exports and Shapefiles for GIS projects; Originals, Highlights, and Edited for photos & video; etc.


Pros:

  • This is great! It works automatically
  • Simple code. It executes in 6 lines.  View the code here

Cons:

  • I quickly realized how awfully tedious it is to have to slow double click to rename, something every time I create a new project. I need some kind of interface to enter a project name, and I haven't had great luck using TkInter yet.
Note: I've heard good things about PyQt for an interface
  • I don't necessarily want those sub-directories for every project

VBScript

My best solution so far was to write a VBScript (.vbs format) to prompt me for a project name AND ask if I want to add those common project sub-folders.


Pros:

  • Most efficient method so far
  • Quick, easy, no renaming
Cons:


  • Slightly longer code (24 lines without comments & line continuation), but it does include some more logic handling. View the code here.
  • This is still generalized, and the "common subdirectories" option is hard coded (i.e. I don't need a Shapefiles directory in a video editing project).
Overall, This VBScript method opens the door to writing a slightly larger executable in Visual Studio with a more dynamic interface to add any kind of project folder - but that moves away from the original requirement of a highly rapid way to add a project folder automatically. I think this nails it.


    Tuesday, September 16, 2014

    Cannot Register Assembly for ESRI.ArcGIS.Desktop.AddIns

    I'm doing a lot of coding in Visual Studio 2010 for ArcGIS Desktop Add-ins at 10.2. Every few saves (build/rebuild solutions/etc.) I get an annoying message:
    Cannot register assembly "[path to my project]\[Projectname].dll". Could not load file or assemly ' ESRI.ArcGIS.Desktop.AddIns, Version=10.2.0.0, Culture=neutral, PublicKeyToken=[Unique Token]' or ont of its dependencies. They system cannot find the file specified.
    Screenshot of the error in the Error List window
    Try one or both of the following procedures to solve this problem.

    Disable COM Interop Registraion

    Some Esri forum posts mentioned to sure the "Register for COM interop" setting was disabled. Here's how to find it in Visual Studio 2010:

    • Go to the Properties window for the project from the Solution Explorer
    • Navigate to the Compile tab
    • Uncheck Register for Com interop toward the bottom of the page

    • Close and re-open Visual Studio and it should solve the issue.  If not, try the next step that we've been using a bit

    Remove & Re-Add AddIns Reference

    This usually only works for a few hours, or up to a few days, but it'll definitely solve the problem so you can continue work.
    • Open the Properties window for the project again, but navigate to the References tab.
    • Scroll down through the references and look for ESRI.ArcGIS.Desktop.AddIns under the Reference Name field. Highlight it and click the Remove button

    • Click the Add button just to the left of the Remove button and choose Reference...
    • Navigate to the .NET tab
    • Scroll down a ways (further than you might think; it's not necessarily in alphanumerical order) to find the ESRI.ArcGIS.Desktop.AddIns component.  Select it and click OK to add it. As long as you removed it in the previous step, it will be included in this list.
    • Close Visual Studio.  When you open it again, the problem will be fixed


    Friday, August 12, 2011

    Connect to ArcMap layers and tables with VBA

    Example description:
    I am editing a coverage of stream segments (lines) and would like to log any updates to a non-spatial, standalone table in the geodatabase so I can keep track of the evolution of the dataset over time.  The application will first need to know which datasets to edit, so I start by adding  two combo boxes to the form that will be automatically populated with the two necessary types of data, named cboFlowingWatersLayer, and cboFlowingWatersUpdateTable, respectively.


    The first combo box will allow me to select any of the the spatial datasets (geodatabase coverages/feature classes/shapefiles/projected datasets/etc.) that are available in the Table of Contents pane:

    Map layers in an active ArcMap project

    The second combo box will select the non-spatial, standalone table (highlighted below) that is otherwise available under the Source tab in the Table of Contents pane.  There are two additional dummy tables that I added to this project that are not visible in the screenshot below, but you'll see them later.

    Non-spatial tables in an ArcMap project

    Coding:
    I add some code to populate the combo boxes with any available layers or standalone tables when the form activates.  There's a brief Setup section, then an If/Then statement will check to see if there is a layer already set in there.  If not, it'll clear it and populate the control with any spatial layers that are available.  If there is anything in there, it will run a separate function to check if it's the right layer.  I won't address that procedure here, so it's commented out below (though I recommend adding such a function). Let's get started with filling in the names of just the spatial datasets first:

    Private Sub UserForm_Activeate()
    'Setup
      Dim pMxDoc As IMxDocument
      Dim pMap As IMap

      Set pMxDoc = ThisDocument
     
    Set pMap = pMxDoc.FocusMap

    'Populate the first combo box with any available spatial
    ' layers that will show up in the Display tab in the
    ' ArcMap Table of Contents pane
      Dim i As Integer
      If cboFlowingWatersLayer.ListCount = 0 Then
          cboFlowingWatersLayer.Clear
          For i = 0 To pMap.LayerCount - 1
              Me.cboFlowingWatersLayer.Additem (pMap.Layer(i).Name)
          Next i
      Else
          'Call Me.FlowingWatersLayerCheck
      End If

    End Sub

    What should appear when the first combo box is selected are any layers that are available the Display tab of an ArcMap project.


    (Note that apps can only work with shapefiles, geodatabase coverages, etc. and not groups of data.  Data groups appear in this example as individual layers, but since they are not really spatial datasets, selecting them will cause an error at run time if they are selected and processed.)

    Next we'll add some more code to add any standalone tables that are in the project using the IStandaloneTableCollection interface:

    Private Sub UserForm_Activeate()
    'Setup
      Dim pMxDoc As IMxDocument
      Dim pMap As IMap
      Dim pSATCollection As IStandaloneTableCollection 

      Set pMxDoc = ThisDocument
     
    Set pMap = pMxDoc.FocusMap
     
    Set pSATCollection = pMxDoc.FocusMap

    'Populate the first combo box with any available spatial
    ' layers that will show up in the Display tab in the
    ' ArcMap Table of Contents pane
      Dim i As Integer
      If cboFlowingWatersLayer.ListCount = 0 Then
          cboFlowingWatersLayer.Clear
          For i = 0 To pMap.LayerCount - 1
              Me.cboFlowingWatersLayer.Additem (pMap.Layer(i).Name)
          Next i
      Else
          'Call Me.FlowingWatersLayerCheck
      End If

    'Populate the second combo box with any available non-spatial
    ' tables that will show up in the Source tab in the
    ' ArcMap Table of Contents pane
      Dim j As Integer
      If cboFlowingWatersUpdateTable.ListCount = 0 Then
          cboFlowingWatersUpdateTable.Clear
          For j = 0 To pSATCollection.StandaloneTableCount - 1
              Me.cboFlowingWatersUpdateTable.Additem _
                  (pSATCollection.StandaloneTable(j).Name)
          Next j
      Else
          'Call Me.FlowingWatersTableCheck
      End If

    End Sub

    Finally, this is what the second combo box will look like (with the additional two dummy datasets that were hidden from view in the screenshot above - they're named "Delete - Test 1" and "Delete - Test 2"):


    Referencing the selected layer/table:
    There are a virtually unlimited number of uses for mapping layers like this.  The idea is that the method above provides a heads-up interface to access the position of a given layer or table in the Table of Contents.  Think of the position as the dataset's number in line, starting at 0 instead of 1.  Take the five spatial "layers" that are available for example:

    Place in lineVB Position #Layer Name
    1st / Top
    2nd
    3rd
    4th
    5th / Bottom
    0
    1
    2
    3
    4
    "FlowingWaters layer"
    "New Group Layer"
    "Florida NHD"
    "SWFWMD_draft_primary_canals"
    "Reporting Units"

    Whenever you need to use a specific layer, the interface we built above will allow a quick way for Visual Basic to reference the position number of a selected layer.  Of course you will need some error checking and handling code to ensure that the layer position isn't changed (adding, removing, or moving the order of layers in the Table of Contents will affect each layer's position number).

    The following are a few examples on how to reference a layer's position number using the interface that we built above.

    Example 1 - Connect to a dataset:
    A working example follows, so don't worry about the function of the code yet.  This simply illustrates the structure of references needed to connect to a dataset.

    The previous sections explain that an ArcMap project is made of up layers and sometimes non-spatial tables.  Further, those layers and tables have position numbers associated with them that are usually just unimportant background information.  Well, now we will use those position numbers to tell a program where to target its procedures.

    After we choose a layer from the program interface, that combo box/pull down menu will store our selection as a number, which it refers to as its ListIndex.  Now if we want to know which layer or table we chose, we'll call it by referencing cboFlowingWatersLayer.ListIndex.

    In the example below, we are instantiating a new variable based off of the IFeatureLayer interface (again, don't worry about what's happening yet).  We will set that new variable, named pFeatureLayer, equal to a specific layer number (position number) in an ArcMap project so we can do some more work on it later.  Just pay attention to the way that the combo box position is referenced:

    Dim pMxDoc As IMxDocument 'Whatever
    Dim pFeatureLayer As IFeatureClass 'Slightly Important
    '...more code

    Set pMxDoc = ThisDocument 'Still not the point
    'Oh, here we go!
    Set pFeatureLayer = _
      pMxDoc.FocusMap.Layer(cboFlowingWatersLayer.ListIndex)
    '...more code


    Ok! This essentially told the function/sub routine that:
    1. We're working with this project (aka ThisDocument)
    2. We're looking for a specific feature layer (spatial dataset/shapefile/geodatabase coverage/etc.)
    3. That dataset of interest will be in a certain position when you focus the map; and that position number can be found by A) looking at the combo box (pull down menu named cboFlowingWatersLayer) and B) pulling its current ListIndex value.
    Got it.  Let's move on to a working example.

    Example 2 - Count the selected spatial features:
    Add two command buttons to the form, named cboLayerCount & cboTableCount, and change their captions to match the screenshot below

    Added two command buttons

    When a user clicks on one of these buttons, a message box will report how many records are selected in a layer or a table.  I'll add a quick error check at the beginning to make sure that a layer has been selected.  If a layer has not been selected yet, the ListIndex value will be -1. Here's the code:


    Private Sub cmdLayerCount_Click()
    'Error Checking
      If cboFlowingWatersLayer.ListIndex = -1 Then
          MsgBox "Please choose a layer to count."
          Exit Sub
      End If

    'Setup
      Dim pMxDoc As IMxDocument
      Dim pMap As IMap
      Dim pFS As IFeatureSelection
      Dim pSelectedFeatures As ISelectionSet

      Set pMxDoc = ThisDocument
      Set pMap = pMxDoc.FocusMap
      Set pFS = pMap.Layer(cboFlowingWatersLayer.ListIndex)
      Set pSelectedFeatures = pFS.SelectionSet 

    'Display a message box to report info
      If pSelectedFeatures.Count = 1 Then
        MsgBox "There is 1 feature selected."
      Else
        MsgBox "There are " & pSelectedFeatures.Count & _
            " features selected."
      End If

    End Sub

    Save this, run the code, select a few features and you should get something like this:


    Example 3 - Count the selected standalone table features
    Using the same GUI (graphic user interface) that was built in the previous example, apply the following code to the "Table Count" command button to count the number of selected records in a standalone table.  A very similar method will be used for this procedure, however we will need to use the ITableSelection inteface in place of the IFeatureSelection interface since we're working with a standalone table instead of a spatial dataset.  Further, I won't need to sort through any of the selected features in the standalone table in my larger project, so I'll leave out the Selection Set and count directly from my Table Selection:

    Private Sub cmdTableCount_Click()
    'Error Checking
      If cboFlowingWatersUpdateTable.ListIndex = -1 Then
          MsgBox "Please choose a layer to count."
          Exit Sub
      End If

    'Setup
      Dim pMxDoc As IMxDocument
      Dim pSATCollection As IStandAloneTableCollection
      Dim pTS As ITableSelection

      Set pMxDoc = ThisDocument
      Set pSATCollection = pMxDoc.FocusMap
    'This next bit must be on the a single line;
    '  the format of this blog makes coding difficult.
      Set pTS = pSATCollection.StandaloneTable(
           cboFlowingWatersUpdateTable.ListIndex)

    'Display a message box to report info
      If pTS.SelectionSet.Count = 1 Then  
          MsgBox "There is 1 feature selected."
      Else 
          MsgBox "There are " & pTS.SelectionSet.Count & _
              " features selected."
      End If

    End Sub

    Now, after you map a standalone table in the Flowing Waters Update Table combo box and click the Table Count command button, you will be able to count any selected records in the table, just like you would count the records in a spatial layer.


    Wednesday, April 28, 2010

    Install Non-Packaged 3rd Party GIS Plugins

    Many third party GIS plugins have been neatly packaged into .dll files or batch files (ET GeoWizards, arcscripts.esri.com/resources.arcgis.com, etc.) that can be installed or imported into ones software interface in one step.  This easy method is not always available.  Below is an example of how to install a non-packaged plugin.  For further explanation on any of these steps, refer to a previous article on GIS Desktop Customization.

    I'll use my Attribution Assistant in the following example - Download the installation package (12 kb)

    What's included:
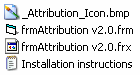
    • _Attribution_Icon.bmp is a graphic to use as the icon that will be used to launch the tool from the ArcMap interface
    • frmAttribution v2.0.frm is the form that will be imported into ArcMap.  The source code is stored in this file, and can be viewed when opened by a text editor.  Do not change any of these settings via text editor.
    • frmAttribution v2.0.frx a VB binary file that accompanies the .frm file that holds graphics and other information that will be used by the application
    • Installation instructions.txt is a "Readme" text file with information about the plugin

    Install:
    • Open ArcMap
    • Open the Visual Basic Editor from Tools menu under Tools :: Macros :: Visual Basic Editor
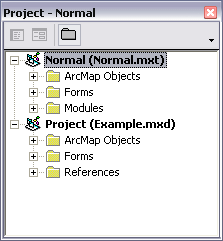
    • Locate the Project Explorer (see below).  If you want the tool to be available every time you open ArcMap, you'll import the plugin under the Normal.mxt branch.  Otherwise, installing the application under the Project branch in the Project Explorer will only allow access to the tool when working under a specific ArcMap project (a saved .mxd file).
    Undocked Visual Basic Project Explorer
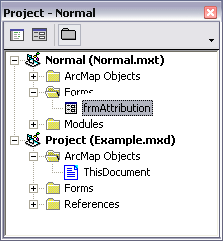
    • Right click on the Normal branch and choose Import File so the plugin will be available every time ArcMap is opened.  Navigate to where the install package was unzipped, choose frmAttribution v2.0.frm and click Open.  Expand Normal and Forms to view the new form (see below), otherwise close the Visual Basic Editor.
     frmAttribution successfully imported
    • Back in ArcMap open the Customize dialog via Tools :: Customize
    • Navigate to the Commands tab
    • Ensure that the Save in: setting is set to Normal.mxt to ensure that the tool will be available every time ArcMap is opened
    • Scroll to the bottom of the Categories menu and select [ UI Controls ]
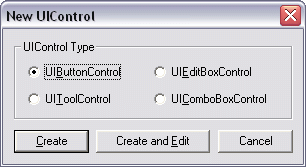
    • Click the New UIControl button, choose UIButton Control
    • Slow double click on the new control probably named Normal.UIButtonControl1 in the Commands list and rename it "Attribution_Launch."  When you press enter it will automatically rename itself "Normal.Attribution_Launch"
    •  Drag the new control onto the ArcMap interface
    •  Change the button face icon: With the Customize dialog still opened, right click on the icon that was just dropped onto the ArcMap interface and under the Change Button Image sub-menu, choose Browse
    • Navigate to the directory where the installation package was unzipped, choose _Attribution_Icon.bmp and click Open
    •  With the Customize dialog still open, right click on the new button on the ArcMap interface one more time and choose View Source.  The Visual Basic Editor will open, and will automatically open the ThisDocument code under Normal.mxt, with some code written for you (don't worry if you don't completely understand this part, just follow the directions to get through it)
    • Copy and following line and paste it into the Attribution_Launch_Click subroutine:
      Normal.frmAttribution.Show (vbModeless)
      It should look like the following:
    Private Sub Attribution_Launch_Click() 
        Normal.frmAttribution.Show (vbModeless)
    End Sub

    • Close the Visual Basic Editor when finished and you're good to go!  Click on your new button to launch the newly imported ArcMap plugin!

    Friday, April 23, 2010

    Attribution Assistant: Toolset/Plugin for ArcMap 9.x

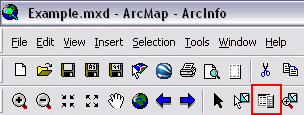
    Attribution Assistant icon

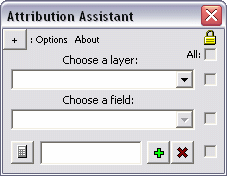
    Attribution Assistant interface


    This (free) application is a plugin for ArcMap 9.x that allows a user to rapidly attribute GIS data.  Simply launch the tool from a button on the ArcMap interface to begin (installation instructions below).  Use the two menus to choose an available layer and a field to attribute.  Next, type a value in the text box, select some features, and press the Calculate button to quickly apply the attribution.  It's as simple as that.

    Features:
    Use the Add and Remove buttons to manage up to 16 attribution values.

    Use the check boxes to "disable" a specific field or restrict access to altering the current properties - this prevents the manipulation of information.  The topmost check box enables or disables all other check boxes at once (see graphic below).  Click the button in the top left corner to expand a few extra features (see below).

    A layer and field are set with four attribution values

    Use the Mirror tool to flip the interface for easier access to a particular control (see below).  For instance if you would rather have the Attribution Assistant sit on the left side of the screen, a user can flip the interface so the mouse does not have to travel as far to click the Calculate button.

    The interface is reversed with the Mirror tool

    Minimize the Attribution Assistant application with the Minimize button.  When you launch the tool again from the main icon on the ArcMap interface all settings will be preserved.

    Use the Import button to automatically populate the attribution boxes with (up to 16) unique values that exist in the dataset in decreasing order.

    Uses:
    • Basic attribution - select features on-the-fly with the Select Features Tool and click the calculate button on the Attribution Assistant to apply the custom value to each of the selected features. Add a blank text box that can be used to clear an existing value.
    • In an editing session - use the Attribution Assistant in an editing session to quickly attribute data as it is being digitized.  Rather than clicking inside the Attributes dialog (launched from the Editor toolbar ) or clicking inside a cell in the Attribute Table and typing a (or pasting a copied) value for each new feature, one can simply close the polygon, click a single button to apply attribution, and continue.
    Dynamic Help:
    Click on any label to bring up a small explanation for each feature in the application.  Look for the Help pointer as you hover over a label

    Installation:
    View the installation instructions for this tool in the article titled, "Install Non-Packaged 3rd Party GIS Plugins"


    Refer to a previous article on GIS Desktop Customization to learn about manipulating buttons/tools and toolbars on your GIS interface.

    Thursday, April 22, 2010

    ArcObjects: Clear Selected Features

    The following is the VB code to quickly selected features in ArcMap with ArcObjects. This code will perform the same function as clicking the Clear Selected Features tool on the ArcMap interface.

    There are two parts: the setup (Dim/Set instances), then clear the selection with a partial refresh followed by pMap.ClearSelection (in that order).  This example is a command button that will run the method after a Click event:

    Private Sub cmdClear_Click()
        Dim pMxDocument As IMxDocument
       
    Dim pMap As IMap
       
    Dim pActiveView As IActiveView
        Set pMxDocument = ThisDocument
       
    Set pMap = pMxDocument.FocusMap
       
    Set pActiveView = pMap

        pActiveView.PartialRefresh esriViewGeoSelection, Nothing, Nothing
        pMap.ClearSelection
    End Sub

    Tuesday, April 20, 2010

    GIS Desktop Customization

    I developed and led a training seminar for FDEP's ArcDiscovery Sessions that discusses GIS Desktop customization.  Presented April 15, 2010 to 30 in-house participants and another 20 employees around the state via video conference, this topic is separated into two parts:
    • the configuration of buttons and toolbars on the ArcMap interface
    • an introduction to object-oriented programming for custom GIS tools

    Below are the slides that were presented in the course, however a pdf tutorial accompanies the talk which provides step-by-step instruction on each topic discussed in the seminar.


    Monday, April 5, 2010

    Geometric Field Calculations

    There are a number of common geometric field calculations that I use on a regular basis.  Calculating polygon area & primiter, linear/arc/path distance, or feature centroid coordinates are surprisingly simple to obtain and can prove to be very powerful information.

    If you're working in a geodatabase, many of these will be automatically calculated and updated as features are edited, however these must be re-calculated using the Field Calculator when working with shapefiles.  Here's how:
    • Open a layer's attribute table
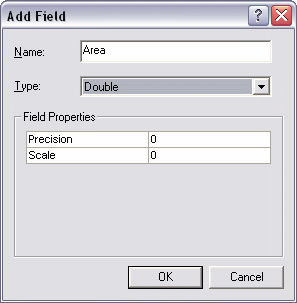
    • From the Options menu at the bottom of the attribute table window choose Add Field... if some kind of area/length/etc. field does not already exist.  
    • Name the new field and choose Double for its type.

      Again, if the layer is in a geodatabase, the SHAPE_AREA and SHAPE_LENGTH fields will be available and updated.  These fields will be present in a shapefile format if they were exported from a geodatabase coverage, but you will need to re-calculate the values.  Don't bother adding a new field if this is the case - just update the existing fields using the following steps
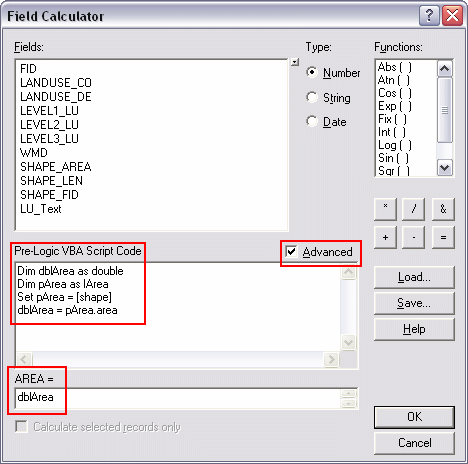
    • Right click on the appropriate field (of type Double) and choose Field Calculator
    • Check the Advanced option box
    •  Use the following code snippets to calculate the appropriate type of geometric information for each feature.  I'll calculate polygon Area for this example, however I can also calculate perimeter or centroids, etc.

      Paste the code (see below) in the Pre-Logic VBA Script Code box, and type the object (the variable that is created in the first line: in this case it's dblArea) in bottom most text box.  Click OK when finished
    •  That's it!
    Below are code snippets for various types of geometric calculations.  Be sure to paste the corresponding object created in the first line (dblArea/dblPerimeter/etc.) into the text box at the bottom of the Field Calculator.

    Area
    Dim dblArea as Double
    Dim pArea as IArea
    Set pArea = [shape]
    dblArea = pArea.area


    Perimeter
    Dim dblPerimeter as Double
    Dim pCurve as ICurve
    Set pCurve = [shape]
    dblPerimeter = pCurve.Length


    Length
    Dim dblLength as Double
    Dim pCurve as ICurve
    Set pCurve = [shape]
    dblLength = pCurve.Length


    X-coordinate of a point
    Dim dblX As Double
    Dim pPoint As IPoint
    Set pPoint = [Shape]
    dblX = pPoint.X


    Y-coordinate of a point
    Dim dblY As Double
    Dim pPoint As IPoint
    Set pPoint = [Shape]
    dblY = pPoint.Y


    X-coordinate of a polygon centroid
    Dim dblX As Double
    Dim pArea As IArea
    Set pArea = [Shape]
    dblX = pArea.Centroid.X


    Y-coordinate of a polygon centroid
    Dim dblY As Double
    Dim pArea As IArea
    Set pArea = [Shape]
    dblY = pArea.Centroid.Y


    Read more in these selected ESRI's articles:
     - Making Field Calculations
     - The Field Calculator Unleashed

    Saturday, February 27, 2010

    Loop Through Controls in VB


    A little info about the tool to the left that I'm building then I'll get to the point:

    This Attribution Assistant (screenshot of version 1) allows a user to quickly apply attribution to selected features in ArcMap.  Say you're attributing a huge dataset of streams (my current project) and they need to be designated either a "river," a "stream," or a "canal."  One can open an editing session and type in the values as they're hilighted, or for several at a time (a bit more efficient) a user can right click on the in the attribute table, and use the Field Calculator to do some en-masse attribution, but she or he will still need to change that one value over and over again.  Back and forth... Kill me.

    Instead, select the layer of interest, then select the field that will hold the attribution, and add up to 16 text boxes for possible values (it starts with just one row, but the screenshot is expanded to 16 for the sake of screenshots...).  Then select some features and click the calculator button that corresponds with the proper value.  That's it.  One click attribution.

    The check boxes to the right disables the corresponding text box and delete button so a user doesn't accidentally change/remove values.  Here's the problem though.  For version 2, there will be a "Check All" check box at the top that will let the user - that's right - select/unselect all check boxes at once.  The best way to do this is to loop through each check box control and set its value to False.

    Easier example to begin:
    • All text boxes should be reset when the the dataset is changed or the form is "reset" for other possible reasons.
    Originally, the Reset procedure/subroutine had 16 lines which manually erase each text box:

    ‘Reset all text boxes to null or  “”
    txtValue01.Text = ""
    txtValue02.Text = ""
    txtValue03.Text = ""
    txtValue04.Text = ""
    txtValue05.Text = ""
    txtValue06.Text = ""
    txtValue07.Text = ""
    txtValue08.Text = ""
    txtValue09.Text = ""
    txtValue10.Text = ""
    txtValue11.Text = ""
    txtValue12.Text = ""
    txtValue13.Text = ""
    txtValue14.Text = ""
    txtValue15.Text = ""
    txtValue16.Text = ""

    This works, but it's lame.  Here's a better way, explained below:

    ‘This is faster
    Dim cControl As Control
    For Each cControl In Me.Controls
    ........'Look for text boxes only
    ........If TypeName(cControl) = "TextBox" Then
    ............cControl.Text = ""
    ....End If

    Next cControl
    [Be sure to remove the dots (....) used to format the above code]

    - Start by creating an object named cControl (or whatever) As a Control.
    - Make a For Each loop that will loop/search through all controls (buttons, text boxes, etc. see my VB Cheat Sheet) in the form.
    - Begin to target which specific controls you want to change.  In this case all text boxes in the form should be changed, but if there were more text boxes, you can add more parameters to a query.  For instance, all text boxes with a certain .Tag or .Name.  Use logic operators (like And, Or, etc.) to add to the query.

    A (just slightly) more difficult example:

    I also want to set .Tabstop = False for some of the text boxes so a user can hit the tab key to move the cursor to the next available text box.  The problem is that I don't want the user to tab to a box that is out of view. (I cheated.  When the form initializes, there seems to be only one row of attribution controls, but there are 16.  The form just gets bigger and the next row of controls are initialized.  They're really there the whole time though.)

    So there's some code to take care of turning the .Tabstop property on, but let's just focus on turning that off as well.  I'll also include another parameter in the query to find the exact controls, highlighted below:

    ‘Loop through controls
    Dim cControl As Control
    For Each cControl In Me.Controls
    ........'Look for specific text boxes
    ........If TypeName(cControl) = "TextBox" And _
    ............cControl.Name Like "txtValue*" Then
    ............cControl.Text = ""
    ............cControl.Tabstop = False
    ....End If
    Next cControl
    [Be sure to remove the dots (....) used to format the above code]


      Saturday, December 19, 2009

      Quick Zoom Tools


      Download the icons & code package:
      Custom Zoom Tools.zip

      The Bookmarks feature in ArcMap is great for navigating to a saved view, composed of a specific location and scale in a mapping project, however I'm working on a project where I want to zoom to a predefined map scale (1:5,000, 1:30,000, or 1:100,000), but I do not want to change the location.  In this case, Bookmarks are not the answer, so I built three buttons that change the Map Scale with a single click.

      Having this single click option saves up to a couple seconds of looking for an appropriate scale each time a button is used instead of scrolling, switching to the Zoom In/Out tools, or typing a scale unit manually.  It would be much faster (especially over the time span of an editing project) to use "map scale bookmarks" to automatically zoom to a predefined level.

      Three specific scales are chosen to represent three general views:
      • 1:5,000 is a decent large-scale to use for detailed neighborhood-level observations and to zoom in close enough to get a good look at braided stream segments
      • 1:30,000 is an effective medium-scale to use for viewing larger areas, while the user is still able to distinguish smaller anomalies in a coverage or in imagery
      • 1:100,000 offers a much larger visible area.  For projects that stretch over wide areas, this map scale offers a quick step back to pan across the city/county, etc.
      Remember, in cartography "large-scale" refers to larger quotients which are less than, but approach the one.  So as the denominator decreases, scale increases:
      • 1:5,000 = "One-to-five thousand" = 1/5,000 = "One divided by five thousand" = 0.0002
      • Similarily, 1:30,000 = 0.00003
      • 0.0002 > 0.00003, thus 1:5,000 is a larger scale than 1:30,000
      • Further, 1:1 = 1.0, and 1:2 = 0.5, thus 1:1: is larger than 1:2

      Installation:
      • Download and unzip the installation package, containing three bitmap icons, and a text file containing the code: Custom Zoom Tools.zip
      • Move the three bitmap files to C:\Program Files\ArcGIS\Bin\Icons or C:\arcgis\Bin\Icons (depending on your installation)
      • Open the text file Custom Zoom Tools Code.txt. Select All and Copy the text.
      • Open ArcMap and load either a saved project or a blank document
      • From the Tools menu, choose Customize.  
      • Navigate to the bottom of the Categories list and select
        [ UIControls ]
      • Make sure that the Save In menu at the bottom left of the Customize dialog is set to Normal.mxt
      • Press the New UIControl button and Create a UIButtonControl.  Repeat this two more times so the Commands list has three new UIButtonControls

        • Slow double click on each of the new button controls in the Commands list to rename them Zoom5k, Zoom10k, and Zoom100k.  The names will automatically change to Normal.Zoom5k, etc. when finished.  The names of these are important and must match exactally to work with the code.
        • Drag these three new button controls onto a desired toolbar (I put mine next to the Map Scale box)
        • With the Customize dialog still open, right click on each button and navigate to Change Button Image :: Browse.  Choose the appropriate icon ("_Zoom5k" etc.) for each button
        • Close the Customize dialog
        Now just paste the code in the correct spot to finish:
        • Open the Visual Basic Editor by pressing Alt + F11, or by navigating to Tools :: Macros :: Visual Basic Editor
        • In the Project Explorer pane, expand "Normal (Normal.mxt)," and "ArcMap Objects" and double click on ThisDocument.

        • A window will open named "Normal.mxt - ThisDocument (Code)."   Scroll to the bottom of this text, add a few lines by hitting enter a few times, and paste all of the code from the text file included in the download above
        • Save this document of code, close the Visual Basic Editor and test the buttons.

        The Code:
        In the following example a few elements are prepared to change the map scale, the map scale is set to 1:5000 (pMap.MapScale = 5000), and the map is refreshed so the new map scale will be visible to the user:

        Private Sub Zoom5k_Click()
        'Change the scale of the current view to 1:5,000

        Dim pMxDocument As IMxDocument
        Dim pMaps As IMaps
        Dim
        pMap As IMap 
        Set pMxDocument = ThisDocument
        Set pMaps = pMxDocument.Maps
        Set pMap = pMxDocument.FocusMap
        pMap.DistanceUnits = esriUnits.esriInches

        pMap.MapScale = 5000

        pMxDocument.ActiveView.Refresh 

        End Sub

        Friday, November 13, 2009

        System Shut Down Utility


        This is a very light utility that I coded in just a few hours. It's purpose is to shut down the computer after a selected amount of time from the combo boxes (between 5 minutes to over 6 hours). The simple .exe illustrates a few basic but useful VB techniques:
        • Setting up combo boxes & values
        • Global variables
        • A timer
        • Time / Date / Now functions
        • Call functions from other subroutines
        • and the main feature, automatically shut down the computer
        Instructions:
        • Download and unzip the package. Rename if necessary (see Final Tricks, below)
        • Open the program. The current date and time will display
        • Choose an amount of time from the Hours, and Minutes menus
        • Click "Commit" when ready. You will be prompted to verify (Yes or No) that you are ready to begin, choose Yes to continue
        • The time will be updated to report when the count began, and the remaining time (in minutes) will update every 60 seconds. When the time expires, the computer will automatically shut down. That's all there is to it!
        Here are the guts of it:

        Combo Boxes:
        First, the contents of the pull down / combo boxes are set up in the Form_Load() subroutine, thus the contents of each menu are loaded when the app starts. Here's the code for the minutes list:

        Private Sub Form_Load()
        cboMins.AddItem ""
        cboMins.ItemData(cboMins.NewIndex) = 0
        cboMins.AddItem "5"
        cboMins.ItemData(cboMins.NewIndex) = 5
        cboMins.AddItem "15"
        cboMins.ItemData(cboMins.NewIndex) = 15
        cboMins.AddItem "30"
        cboMins.ItemData(cboMins.NewIndex) = 30
        cboMins.AddItem "45"
        cboMins.ItemData(cboMins.NewIndex) = 45
        '...
        End Sub

        Global Variables:
        When the command button is clicked to run the program, the values from each of the combo boxes are passed to the intHours/intMinutes variables which have been dimensioned in the General Declarations (the topmost portion of the code editor). These can be called by various other functions to verify that a time has been selected (intHours + intMinutes > 0?), or to set the iterations of the timer, etc.

        Option Explicit
        Dim intHours As Integer
        Dim intMinutes As Integer
        _____________________________

        Private Sub Form_Load()
        '...

        The VB Timer, Shutdown, & Calling Subroutines:
        Timers can be a little tricky in this situation, but they're basically simple. There are two main properties: Enabled (on/off), and Interval (how long the timer runs). It would be great to set the timer to run for 4 hours and 5 minutes, but that's not how it works. The timer runs for a given number of milliseconds (1,000 milliseconds = 1 second) between 0 and 65,535 (just over 1 minute, 5 seconds). Instead we'll make a variable that will represent the total number of desired minutes, and loop through ever second (tmrShutDown.Interval = 60000) until the counter = 0; then run the desired procedure.

        First, add a Timer control (Visual Basic 6) to the form named tmrShutDown. In Form_Load(), set the timer's Interval to 60000 (one minute) and make sure the timer is off as the app loads.

        Private Sub Form_Load()
        tmrShutDown.Enabled = False
        tmrShutDown.Interval = 60000
        '...
        End Sub

        Before the timer is enabled (via the command button), set a predefined global variable (intTime) to equal the amount of desired time in minutes. Now tell the timer to start running. Now when the timer is enabled, some code will run inside the timer's subroutine every 60 seconds (or 60,000 milliseconds); essentially as a loop. This will reiterate every 60 seconds until it is told to stop (tmrControl.Enabled = False). Insert a simple if-then statement: If the time counter (intTime) = zero, stop the timer and call the procedure to turn off the computer, otherwise, subtract one from the counter and continue.

        Option Explicit
        Dim intHours As Integer
        Dim intMinutes As Integer
        Dim intTime As Integer
        ___________________________________________

        Private Sub cmdCommit_Click()
        '...
        intTime = (intHours * 60) + intMinutes
        tmrShutDown.Enabled = True
        '...
        End Sub
        ___________________________________________

        Private Sub tmrCommand_Timer()

        If intTime = 0 Then
        tmrCommand.Enabled = False 'Turn off timer
        Call ShutDown
        Else
        intTime = intTime - 1
        End If End Sub
        ___________________________________________

        Private Sub ShutDown()
        Shell "shutdown -s -f -t 00"
        '...
        End Sub


        Final Tricks:


        You might notice the odd title. Combined that with a similar inconspicuous file name alteration, and the app can go quite unnoticed on a computer - which might be useful to certain users.

        Clicking the command button disables itself and both combo boxes to let the user know that it is working.

        Finally, two labels are updated to include a time that the timer started, and how much time is left before shutdown. This should be updated in the timer's subroutine.

        Private Sub cmdCommit_Click()
        '...
        cboHours.Enabled = False
        cboMinutes.Enabled =
        False
        cmdCommit.Enabled = False

        lblInitial.Caption = "Initial Time: " & Now
        lblTimeLeft.Caption = "Time Remaining: " & intTime

        End Sub