Wednesday, April 28, 2010

Install Non-Packaged 3rd Party GIS Plugins

Many third party GIS plugins have been neatly packaged into .dll files or batch files (ET GeoWizards, arcscripts.esri.com/resources.arcgis.com, etc.) that can be installed or imported into ones software interface in one step.  This easy method is not always available.  Below is an example of how to install a non-packaged plugin.  For further explanation on any of these steps, refer to a previous article on GIS Desktop Customization.

I'll use my Attribution Assistant in the following example - Download the installation package (12 kb)

What's included:
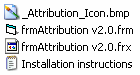
  • _Attribution_Icon.bmp is a graphic to use as the icon that will be used to launch the tool from the ArcMap interface
  • frmAttribution v2.0.frm is the form that will be imported into ArcMap.  The source code is stored in this file, and can be viewed when opened by a text editor.  Do not change any of these settings via text editor.
  • frmAttribution v2.0.frx a VB binary file that accompanies the .frm file that holds graphics and other information that will be used by the application
  • Installation instructions.txt is a "Readme" text file with information about the plugin

Install:
  • Open ArcMap
  • Open the Visual Basic Editor from Tools menu under Tools :: Macros :: Visual Basic Editor
  • Locate the Project Explorer (see below).  If you want the tool to be available every time you open ArcMap, you'll import the plugin under the Normal.mxt branch.  Otherwise, installing the application under the Project branch in the Project Explorer will only allow access to the tool when working under a specific ArcMap project (a saved .mxd file).
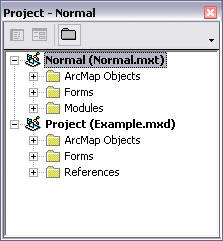
Undocked Visual Basic Project Explorer
  • Right click on the Normal branch and choose Import File so the plugin will be available every time ArcMap is opened.  Navigate to where the install package was unzipped, choose frmAttribution v2.0.frm and click Open.  Expand Normal and Forms to view the new form (see below), otherwise close the Visual Basic Editor.
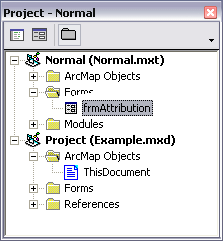
 frmAttribution successfully imported
  • Back in ArcMap open the Customize dialog via Tools :: Customize
  • Navigate to the Commands tab
  • Ensure that the Save in: setting is set to Normal.mxt to ensure that the tool will be available every time ArcMap is opened
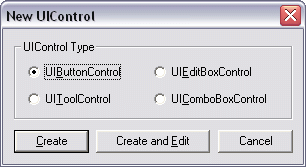
  • Scroll to the bottom of the Categories menu and select [ UI Controls ]
  • Click the New UIControl button, choose UIButton Control
  • Slow double click on the new control probably named Normal.UIButtonControl1 in the Commands list and rename it "Attribution_Launch."  When you press enter it will automatically rename itself "Normal.Attribution_Launch"
  •  Drag the new control onto the ArcMap interface
  •  Change the button face icon: With the Customize dialog still opened, right click on the icon that was just dropped onto the ArcMap interface and under the Change Button Image sub-menu, choose Browse
  • Navigate to the directory where the installation package was unzipped, choose _Attribution_Icon.bmp and click Open
  •  With the Customize dialog still open, right click on the new button on the ArcMap interface one more time and choose View Source.  The Visual Basic Editor will open, and will automatically open the ThisDocument code under Normal.mxt, with some code written for you (don't worry if you don't completely understand this part, just follow the directions to get through it)
  • Copy and following line and paste it into the Attribution_Launch_Click subroutine:
    Normal.frmAttribution.Show (vbModeless)
    It should look like the following:
Private Sub Attribution_Launch_Click() 
    Normal.frmAttribution.Show (vbModeless)
End Sub

  • Close the Visual Basic Editor when finished and you're good to go!  Click on your new button to launch the newly imported ArcMap plugin!

Friday, April 23, 2010

Attribution Assistant: Toolset/Plugin for ArcMap 9.x

Attribution Assistant icon

Attribution Assistant interface


This (free) application is a plugin for ArcMap 9.x that allows a user to rapidly attribute GIS data.  Simply launch the tool from a button on the ArcMap interface to begin (installation instructions below).  Use the two menus to choose an available layer and a field to attribute.  Next, type a value in the text box, select some features, and press the Calculate button 
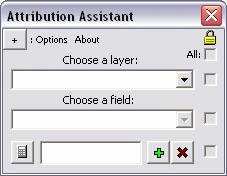
to quickly apply the attribution.  It's as simple as that.

Features:
Use the Add and Remove buttons to manage up to 16 attribution values.

Use the check boxes to "disable" a specific field or restrict access to altering the current properties - this prevents the manipulation of information.  The topmost check box enables or disables all other check boxes at once (see graphic below).  Click the button in the top left corner to expand a few extra features (see below).

A layer and field are set with four attribution values

Use the Mirror tool to flip the interface for easier access to a particular control (see below).  For instance if you would rather have the Attribution Assistant sit on the left side of the screen, a user can flip the interface so the mouse does not have to travel as far to click the Calculate button.

The interface is reversed with the Mirror tool

Minimize the Attribution Assistant application with the Minimize button.  When you launch the tool again from the main icon on the ArcMap interface all settings will be preserved.

Use the Import button to automatically populate the attribution boxes with (up to 16) unique values that exist in the dataset in decreasing order.

Uses:
  • Basic attribution - select features on-the-fly with the Select Features Tool and click the calculate button on the Attribution Assistant to apply the custom value to each of the selected features. Add a blank text box that can be used to clear an existing value.
  • In an editing session - use the Attribution Assistant in an editing session to quickly attribute data as it is being digitized.  Rather than clicking inside the Attributes dialog (launched from the Editor toolbar ) or clicking inside a cell in the Attribute Table and typing a (or pasting a copied) value for each new feature, one can simply close the polygon, click a single button to apply attribution, and continue.
Dynamic Help:
Click on any label to bring up a small explanation for each feature in the application.  Look for the Help pointer as you hover over a label

Installation:
View the installation instructions for this tool in the article titled, "Install Non-Packaged 3rd Party GIS Plugins"


Refer to a previous article on GIS Desktop Customization to learn about manipulating buttons/tools and toolbars on your GIS interface.

Thursday, April 22, 2010

ArcObjects: Clear Selected Features

The following is the VB code to quickly selected features in ArcMap with ArcObjects. This code will perform the same function as clicking the Clear Selected Features tool on the ArcMap interface.

There are two parts: the setup (Dim/Set instances), then clear the selection with a partial refresh followed by pMap.ClearSelection (in that order).  This example is a command button that will run the method after a Click event:

Private Sub cmdClear_Click()
    Dim pMxDocument As IMxDocument
   
Dim pMap As IMap
   
Dim pActiveView As IActiveView
    Set pMxDocument = ThisDocument
   
Set pMap = pMxDocument.FocusMap
   
Set pActiveView = pMap

    pActiveView.PartialRefresh esriViewGeoSelection, Nothing, Nothing
    pMap.ClearSelection
End Sub

Tuesday, April 20, 2010

GIS Desktop Customization

I developed and led a training seminar for FDEP's ArcDiscovery Sessions that discusses GIS Desktop customization.  Presented April 15, 2010 to 30 in-house participants and another 20 employees around the state via video conference, this topic is separated into two parts:
  • the configuration of buttons and toolbars on the ArcMap interface
  • an introduction to object-oriented programming for custom GIS tools

Below are the slides that were presented in the course, however a pdf tutorial accompanies the talk which provides step-by-step instruction on each topic discussed in the seminar.


Monday, April 5, 2010

Geometric Field Calculations

There are a number of common geometric field calculations that I use on a regular basis.  Calculating polygon area & primiter, linear/arc/path distance, or feature centroid coordinates are surprisingly simple to obtain and can prove to be very powerful information.

If you're working in a geodatabase, many of these will be automatically calculated and updated as features are edited, however these must be re-calculated using the Field Calculator when working with shapefiles.  Here's how:
  • Open a layer's attribute table
  • From the Options menu at the bottom of the attribute table window choose Add Field... if some kind of area/length/etc. field does not already exist.  
  • Name the new field and choose Double for its type.

    Again, if the layer is in a geodatabase, the SHAPE_AREA and SHAPE_LENGTH fields will be available and updated.  These fields will be present in a shapefile format if they were exported from a geodatabase coverage, but you will need to re-calculate the values.  Don't bother adding a new field if this is the case - just update the existing fields using the following steps
  • Right click on the appropriate field (of type Double) and choose Field Calculator
  • Check the Advanced option box
  •  Use the following code snippets to calculate the appropriate type of geometric information for each feature.  I'll calculate polygon Area for this example, however I can also calculate perimeter or centroids, etc.

    Paste the code (see below) in the Pre-Logic VBA Script Code box, and type the object (the variable that is created in the first line: in this case it's dblArea) in bottom most text box.  Click OK when finished
  •  That's it!
Below are code snippets for various types of geometric calculations.  Be sure to paste the corresponding object created in the first line (dblArea/dblPerimeter/etc.) into the text box at the bottom of the Field Calculator.

Area
Dim dblArea as Double
Dim pArea as IArea
Set pArea = [shape]
dblArea = pArea.area


Perimeter
Dim dblPerimeter as Double
Dim pCurve as ICurve
Set pCurve = [shape]
dblPerimeter = pCurve.Length


Length
Dim dblLength as Double
Dim pCurve as ICurve
Set pCurve = [shape]
dblLength = pCurve.Length


X-coordinate of a point
Dim dblX As Double
Dim pPoint As IPoint
Set pPoint = [Shape]
dblX = pPoint.X


Y-coordinate of a point
Dim dblY As Double
Dim pPoint As IPoint
Set pPoint = [Shape]
dblY = pPoint.Y


X-coordinate of a polygon centroid
Dim dblX As Double
Dim pArea As IArea
Set pArea = [Shape]
dblX = pArea.Centroid.X


Y-coordinate of a polygon centroid
Dim dblY As Double
Dim pArea As IArea
Set pArea = [Shape]
dblY = pArea.Centroid.Y


Read more in these selected ESRI's articles:
 - Making Field Calculations
 - The Field Calculator Unleashed