Thursday, June 4, 2009

Microsoft Office 2007: Fail

Not impressed. Whatsoever.

Microsoft Office 2007 is clunky, awkward, and uninformed. Also it seems like it's trying to dress like a Mac. Look, there's nothing cool, hip, or sleek about spreadsheets or databases. Don't kid yourself on this one. Keep it simple.

Most importantly to me though is that Excel 2007 no longer supports dBase IV, the .dbf file type, because they decided that "nobody uses it anymore." It turns out that DBF is one of a hand full full of required files that make up a shapefile in the world of another proprietary, monopolistic software giant: ESRI's ArcGIS. Don't get me wrong, I bought into the ArcMap scene as well, but it baffles me that A) Microsoft did not do their research before giving the axe to DBF, and B) ESRI did not talk to Microsoft about what is to be expected in their next huge software rollout. FAIL. The both of you.

Anyway, Office 2007 was recently loaded onto my machine at work, and I quickly opted to have Office 2003 installed underneath. I can live with 2007 on my computer, but I am not interested in using it (at least Excel) on a regular basis. I decided to go ahead and return Excel 2003 to the default program used to open .xls files:
  • From the Start Menu choose Run
  • Enter the following (the path may be different on another machine) and hit Enter/OK
"C:\Program Files\Microsoft Office\OFFICE11\EXCEL.EXE" /regserver

That's it. The OFFICE11 directory is where Office 2003 lives, and will now be used to open .xls files with Office 2007 installed as well.

Other Options:
  • Save an Excel 2007 file as .csv, import the CSV in Access 2007 and export as a DBF. What a lame, unnecessary waste of time.
  • Download the free OpenOffice software package. The DBF support from OpenOffice is supposedly much for friendly than Excel ever offered, though I have not gotten around to trying it out.
  • Change industries. Open a surf shop.

Wednesday, May 27, 2009

DIY Inexpensive Computer

My laptop is a few years old now (Hanukkah/Christmas gift in 2005) and I haven't upgraded the RAM or anything yet. Although it works just fine for my needs it begins to be a little slow during mixing and mastering of large projects. Putting together a near top of the line machine that is memory and processing heavy from commercial web sites (Dell, etc.) usually comes with tons of expensive junk that I don't want nor need (high-end video, expensive CD/DVD drives, Windows Vista, other software bundles, warrenty, etc.).

I decided to save a little money on a case (usually between $40 and $100) and went for a unique design. Mounting a computer on a piece of plywood is sort of artsy (technology vs. simple wood), looks neat, and with all of the pieces exposed the computer will stay very cool; thus will run faster.

[Click to enlarge]

Overview of building a computer from scratch:
One can easily put together a powerful computer on any number of commercial websites (Dell, etc.), but when it comes down to it building a computer from scratch is not that difficult. Seven basic pieces make up a computer these days. You'll need a motherboard to route all the signals from the various components, a processor to run calculations and to "think," CPU cooling fan that sits on top of the processor to keep it cool (do not run a computer without this or you will fry the processor), memory/RAM to provide a quick place to store calculations for the CPU to process, a hard drive to store information, and a power supply to distribute power to all of these components. Usually you'll want a CD/DVD drive as well, but even these are becoming outdated media - especially since it's possible to boot to a USB jump drive to install an operating system and other software.

Most small desktop computers have audio, video, eithernet, and USB components built into the motherboard so these are either A) not necessary to add, or B) can be added/upgraded via PCI slots. I added a firewire hub via PCI card. Audio and video upgrades won't be necessary since I will be using my mixer as the auido card (via firewire), and my needs are not graphics-heavy so I don't need to use an upgraded graphics card (usually between $40-$200 for gamers/video producers). Don't forget a mouse, keyboard, and monitor. NOW it's done.


Construction / Pricing:

Computer - $256.99 (add $20 shipping)
  • Intel D945GCPE 3.0 GHz MicroATX Motherboard - $56.41
    - Onboard audio, video, eithernet, USB 2.0
  • Intel Pentium D 925 3.0 GHz Dual-Core Processor - $73.58
  • CPU Cooling Fan - 24.99
  • 2 GB DDR2 RAM - $59.99
    - 2 x 1024 MB sticks
  • 350-Watt ATX Power supply - $24.99
  • 4-port Firewire PCI Card - $16.99
  • I had a spare 80GB hard drive laying around but these are cheap (as of summer 2009, a 500GB internal SATA hard drive goes for 60 bucks. Can't beat that! [P.S. yes, you can beat that.])
  • I also had a spare CD/DVD burner (~$40)
  • Go to a local computer repair/electronics shop and pick up a soft booting power switch/restart switch, LED lights, and a small PC speaker. These plug into pins on the motherboard (illustrated very well on the motherboard's instructions sheet) and let you turn the computer on. The LED's will let you know when the machine is running, and the speaker beeps when the computer boots or has an error. These are very cheap: under $5.
Mounting - $20-30
  • Plywood board (around 14" x 18" x 1/2")

  • Machine screws 1 1/2"
  • Rubber washers
  • Plastic spacers
  • Hex nuts
    - Mark and drill holes on the plywood where mounting screws secure the motherboard (look for the mounting holes on the motherboard)


  • Drywall screws
  • 4 rubber feet
    - Drill four pilot holes through the plywood
    - Drive a drywall screw (sharp point) through the hole; it should be a hand tight fit
    - Screw on the rubber stoppers

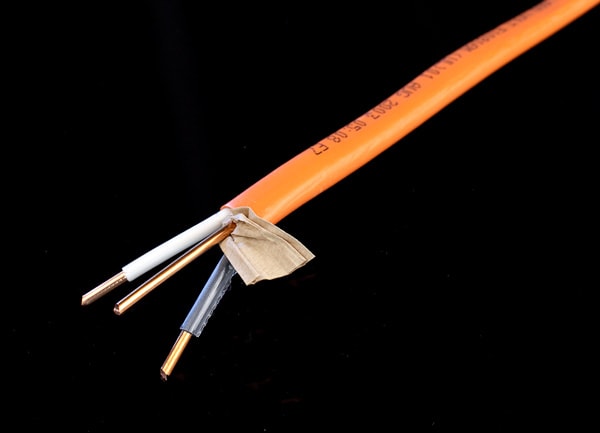
  • Romex / strong gauge wire
    - The two coated wires in romex wire bundles are great for mounting the power supply, hard drive, and CD/DVD/Floppy drives to the plywood. Do not use the uncoated ground wire
    - Drill small holes through the plywood, just large enough to fit the wire through
    - Use pliers to bend the wire around squared corners to fit the component well, and to pull the wire tight on the bottom of the board
I added a couple more bolts/plastic spacers to help secure the drives/power box in place. Otherwise that's it. Now just add a monitor (I found a nice flat panel LCD on Craigslist for $100), keyboard, mouse, and install an operating system and you're ready to go.

Thursday, May 14, 2009

My Studio Hardware

AKA Rack additions, $100 at a time

I've been building my little studio for long enough now that I figure that I'd post my thoughts on what I've come across.

Alesis MultiMix 12 FireWire 12-Channel Analog Mixer:


[Click to Enlarge]

My setup is based around this mixer when it's time to record. Lots of control over the inputs and outputs makes it great for controlling various keyboards, turn tables, effects, etc. in a live setting as well.

Pros:
  • Firewire over USB allows track by track recording in a digital audio workstation (DAW), rather than USB which only sends a stereo mix of all inputs
  • 100 28-bit onboard effects are pretty decent - easy control over how wet/dry the effect will be for each individual channel
  • A little EQ and panning is standard. Not bad.
  • Onboard XLR / gain / phantom power - neat
  • Lots of output options / multi-out combinations
  • Easy effects loop (out/return) option available
Cons:
  • Onboard effects are only applied to analog outputs - The digital mix going to the DAW via Firewire is dry. I've been meaning to try looping a wet stereo output through two channels, and recording just those two tracks via DAW, but that has its own problems. IT could work, but it's too much effort
  • Alesis has mostly shitty software support (along with M-Audio). A lot of reviews were complaining about their computers not recognizing it. It can be tricky, but just make sure to install all software before plugging it into a computer
  • Only four channels of XLR/gain: The expensive solution is to upgrade to the MultiMix 16 (for twice the price), or add a preamp to your rack. I chose the latter (below)
All in all, this is a great starter to mid-range mixer. It was cheap, and built pretty well. The effects knob feels a little loose, but it's hanging in well enough. It provides great quality digital audio and minimal if any latency during recording. Very powerful for the price. Unfortunately it has been discontinued. I'd recommend picking one up if you find it floating around on Craigslist or something.

Behringer Eurorack UB 1202 (outboard auxiliary mixer):

The Alesis Multimix is a great way to record multiple tracks, but I don't always need to record all the tracks I need to hear in a recording session.  When I'm laying down drums tracks with my band, I find it helpful to hear as many of the other parts as possible (guitars, bass, vocals, etc.) so I don't have to struggle to listen for different cues that I'm not used to.  The guitar amps and vocals are brought up to level and mixed on this board, then a stereo signal is sent to an open channel on the main board and blended into my headphone mix.  This is a really powerful tool for around $80, new.

Additionally it's a cheap, small, and effective mixer for a live show with four channels of gain, phantom power, plenty of outputs, and even some effects routing options.

Nady PRA-8 Preamp
:


This is a pretty decent unit for around $100. I cannot complain about much noise at all - haven't noticed any additional noise from low quality microphones. It has 8 channels of gain to add to the Alesis mixer, and converts XLR inputs to 1/4" outputs - which work very well as additional inputs into the mixer. Two birds: RIP.


Behringer DSP2024P Virtualizer Pro - Rack Effects Module:


Next is the effects module. Two channels can be used in stereo on certain effects (ping-pong delay, etc.) or as two separate effects. I haven't used it to its full potential yet but it's a great addition to my rack for around $100. Very affordable, customizable, and extensible.


Behringer AMP800 4-channel Headphone Amp:


This is a nice little tool that splits left and right outputs from the mixer into four separate headphone channels; all of which have their own level and balance controls. This is very neccessary for collaborative work, or if another pair of ears wants to listen in on the mix. Again, cheap and effective.


Furman RR-15x - Power Conditioner:


Basically this is a nice rack-mounted surge protector; not much conditioning is happening. There are 8 outlets on the back and one for easy access on the front, all controlled by the single switch on the front. I was worried about lots of EM interference and buzz by having so many wires going on in the mixing cart (later post) however it's really not a problem. This may or may not be to thank. Probably not, though it absolutely keeps things tidy and simple. I run a spooled heavy duty extension cord to an outlet from the cart. One can find a cheaper surge protector for power management, but I'd say it's worth the extra few bucks to have it in the rack. It looks rad and keeps clutter and the rat king of wires to a minimum.


Behringer V-Amp 2 Guitar Multi Effects Processor:


One more $100 effects module, but I got this one cheap from a friend. Bad Aizzz. There are a bunch of shitty combinations of amps and effects, but there are also lots of really decent quality sounds. It lets you choose the amp style from (smooth blues to metal-face-murder-core), tone (Gain, Low/Mid/High EQ), and effects. THEN you can save your combinations and quickly change between them by hand, or by the inlcuded foot switch. Rad. There's a easy tap tempo button to control some of the delay effects, and a pretty decent onboard tuner mode.

Con: There is a 1/2 second-ish gap of dead space between changing effects.

That's about it for the cons. Cheap and versitile! Run this through some outboard reverb and layer it with some other instruments and it's a damn fine tool.

Also, it seems pretty solid. I'd recommend looking for this on Craigslist / eBay for cheap.


Korg mini-KP KAOSS Pad:


Finally stepping up to the mighty $150 range. Totally worth the extra cash. Again, I have not used this to its full potential. I've barely made it through one entire round of futzing with each preset with Missy Elliot on my iPod and it has me drooling.

This tiny little pad allows a user to control two effects at the same time with just the touch of a finger (or two). Tap tempo shows the actual tempo, and the dial will let you zero in on a target if need be. Rotate the dial to quickly change between 100 effects.

Stereo RCA ins/outs, and a 1/8" "headphone" jack (which has a small volume control). Again, rugged as hell, so look for it used. Invest in the 4.5V power adapter.


M-Audio Axiom 25 USB MIDI Controller:


From my recent post describing how to correctly configure this thing, this keyboard turned out to be a rad little Midi controller. Right click on any control knob/slider in Fruity Loops and select "Link to controller," then move one of the controls on the keyboard. Bam. Done. It'll now control any parameter you want. Very cool.

I could maybe use some more sliders, or maybe making half of the dials smooth (rather than all stepping/clicking dials), however there are additional midi controllers that can be connected via the Midi input.

I suggest ASIO4ALL if you are having latency problems (i.e obnoxious lag time between hitting a note on the keyboard and hearing the note). Look for upcoming post on Midi brika-brak

Saturday, May 9, 2009

Facebook/iPhone App Idea #01 - Searchable GeoStatus

Where are you & what are you doing?

Back in my day, Pluto was a planet, and Facebook didn't have pictures! However, it did have one neat feature that I just remembered: one day in April/May it asked the simple question, "what are you doing this summer?" A plurality of my friends answered, and I could compare what everyone was doing. Let's take this a step further.

My idea takes this to the next level. Now that I'm concentrating on research this summer I will not have to attend class; which leaves me a lot more time to travel and do fun things in various cities. My problem is that I am not sure which of my friends are also traveling, and which are stuck in town for the duration.

The app will allow a user to publish where he or she is located, what they are doing, and perhaps even how available they are. This is sort of like an extended status update (however, the "status" has recently been replaced with Twitter-like "What's on your mind" updates).

Examples include:
  • Tallahasse / "Exam week" / Not even close to being free / 1 Week
  • Tallahassee / "FINALLY FINISHED" / Hit me up; I'm passed out on the floor @ Poor Pauls / 3 days
  • Melbourne / "Surfing" / Mostly Free / 1 Weekend
  • New York City / "Vacáish" / Open / 1 Week
  • Tallahassee / "Recovering/Work" / Mostly Busy / 2 weeks
This information will allow your friends in any given location to search and see if you are available to hang out, while enabling you to see who happens to be in the same town as you on sporadic trips home/abroad.

Now to program it... Give me a holler if you're into app development.

See also: Where am I?, Frends GPS, Google Latitude, Twittelator, Loopt, Where

Addressing concerns: App will make use of a sophisticated "Off" / "Unpublish" button. 3 Lols to numerous comments left on Facebook app walls

Tuesday, April 28, 2009

Geostatistical Modeling of Surface Water Sediment Analytes

Presented April 27th, 2009 for Advanced Quantatitave Geography, Florida State University.

Introduction:

DEP Watershed Monitoring program holds a wealth of sampled water and sediment chemistry data. One particular analyte, Cadmium (Cd), is a toxic metal that is found naturally in soil, however it is also a component used in automobile brake pads. An exploratory investigation was attmempted, with the intentions of correlating lake and stream sediment-laden cadmium levels with population density. After numerous failed attempts of importing this dataset into R and GeoDa, this preliminary review of spatial autocorrelation is abandoned and alternative chosen. The new investigation will attempt to examine the spatial distribution of cadmium levels across the state of Florida.

Examination:
  • Plot the raw data
  • Plot the emperical variogram
  • Develop a reasonable variogram model
  • Use model together with the data to create a surface
  • Examine model diagnostics

Default kriging interpolation:

[Basic kriging geostatistical interpolation]


[Same surface with station location distribution]

This simple surface does a moderatly decent job of modeling the phosphate belt in west central Florida, extending east of Hillsborough County, as well as similar areas of phosphate mines around the big bend.


Check for dataset normality:

The histogram shows significant skewness. Extreme outliers -- especially the single 17.2 mg/kg -- might need to be removed to observe a more appropriate distribution of analyte values across the dataset, though I'll leave it in for now

[Histogram shows significant skewness]


The QQPlot further suggests normality is highly suspect. Large portions of the dataset deviate from the mean; low values in particular.


A log transformation is applied to restore normality. Box-Cox transformation provides little variation to the original dataset.

Y(s) = log(Z(s)) for Z(s) ≥ 0

[Log transformation successful in minimizing distance and variation about the mean]


Examine spatial distribution of exceedance values:

[Phosphate belt modeled from adjacent large values]

Explore trend:

Very slight upside down U-shaped trend in east-west direction, and a slightly decreasing planar north-south trend. This is attributed to the unique shape of Florida (as opposed to a more positively correlated distribution possibility in Colorado for instance).


[Occurrences of values across Florida]

[Alternative view]

Examine spatial autocorrelation:


[Semivariogram of the cadmium dataset]

Semivariogram cloud:
  • x-axis = lad distance (distance separating each pair)
  • y-axis = difference² between the values of each pair of locations
- Low lag distance / high variogram value map imply inaccurate data
- Closer locations should be similar
- Distance between location pairs should increase with semivariogram values
- Cloud should flatten out after certain distance; indicates that a relationship between pairs of locations is no longer correlated
- This model experiences significant flattening and inaccuracy; could be alleviated with the removal of the 17.2 outlier

Remove Trend:
  • Use a second order log transformation to remove trend in the northwest-to-southeast direction
  • Use anisotropy to assist in removing directional components to spatial autocorrelation: the variogram increases more gradually and flattens out
[Values are attempted to be kept close to the mean]


Cross validation: Assess the model's performance
  • Mean: Close to 0
  • RMSE / Average Standard Error: as small as possible
  • RMS Standardized Error: Close to 1
[Measuring model's performace]


The 17.2 outlier increases difficulty in judging lower values distribution about the mean, however the lower values are a decent fit.

Results:

Compare cross validation between the original, and fitted model. The map below is then clipped to the state of Florida.
[Cross validation comparison and final interpolated surface]


The fitted model is somewhat more accurate, however this dataset is modeled fairly well with default parameters. This is not the case for other datasets, however. This technique can significantly improve the interpolation of information across space by removing trend, fitting an appropriate model, and finally creating a more reasonable and accurate surface.

Although the levels of cadmium are largely localized, and variable across space, these methods successfully model two important areas of high concentrations of such minerals: the phosphate belt east of Hillsborough county, as well as another region of concentrated mining operations to the north - in the big bend region.

Monday, April 20, 2009

Hyperlinking in ArcGIS 9.2 Via Attribute/Field

Initial Setup:
  • The hyperlink tool is found on the standard Tools toolbar. The icon turns into a yellow lightning bolt when hyperlinked information is available. Otherwise the icon will be grayed out.
  • Open the Attribute table and create a new field that will be used to store the path/url/location of the hyperlinked media (i.e. "C:\images\001.jpg," "http://www.flickr.com/jpg/001.jpg," etc.)
    Name: "Link"
    Type: Text / String
    Length: 100 characters should be suitable

  • Context click (right click) on this layer in the table of contents pane and choose Properties
  • Choose the Display tab
  • Check "Support Hyperlinks using field"
    - Choose Document for images stored on the hard drive
    - Choose URL for web-based images


  • Locations with an associated hyperlink will turn blue when the hyperlink tool is selected. Loctaions without a hyperlink will remain rendered with their predefined symbology.


  • The cursor will turn into an empty lightning bolt when this tool is selected:

  • When hovering over a hyperlinked point, the cursor will become filled:
  • Simply click on a location to open the image in Internet Explorer, Mozilla Firefox, or Windows Picture and Fax Viewer.

Simplify Hyperlink Launching:
  • In the ArcMap Selection menu, choose Options to bring up Selection Options
  • Raise the Selection tolerance to 10 pixels or above to simply selection; otherwise it can be difficult to launch a hyperlink when using a very small (2 pixel) tolerance


Data Management:
  • When collecting in situ data, it may help to simply save the image name to a separate text field ("001" rather than "001.jpg: or "C:\...\001.jpg")
  • Use Field Calculator to populate the full path to the location of the image using a similar statement:
    "C:\Images\" & [FIELD_ID] & ".jpg"


Sunday, April 19, 2009

M-Audio midi controllers and my rage

I'd say recently, but that's just not true. A few months ago I picked up my second M-Audio midi controller. Round one was the Oxygen 49 several years ago. I was familiar with the very strict rule of "thou shalt installith ALL software/drivers before thine plugs hardware into ones computering machine," and was very careful to follow all directions thoroughly and to the letter. Still, something happened and Lappy Tappy would not recognize any signals. Back it went.


[M-Audio Oxygen 49]


As a side note, I work in a pretty techy sort of industry. For a period of time I was installing and managing advanced relational database systems with no problem. I know how to perform geographically weighted regression, use agent based modeling to predict land use change; however, I cannot get a simple USB device to work properly. I can't imagine why Alesis, M-Audio, etc. all continue to provide such shitty, fakucta, and just terrible software support for great pieces of hardware.

Anyway, I picked up my second M-Audio device: the Axiom 25. I figured that it was different enough from the Oxygen so that any remaining drivers/keys left in my registry would not interfere with the operation of this. (Also, these companies are terrible about leaving their grubby cheeto hands all over my computer. An uninstall should NOT leave registry keys for me to trip over later)


[M-Audio Axiom 25]

Of course a fresh install of the most recent drivers, downloaded directly from the M-Audio site did not work. I set this rather rad looking unit to the side and concentrated on school like a good kid.

The problem is that after installing the keyboard, Windows claims that "New hardware is ready to use." Subsequent connections, however claim that a "New" audio device is found. This shouldn't be new...

Also, Fruity Loops, Acid, Reason, Ableton, Midi-Ox, etc. do not recognize any input device as being present. Here's the trick:


  • Install the updated drivers from the M-Audio web site
  • Plug in and turn on the keyboard
  • Open the Device Manager
    - Right click on My Computer and choose Properties
    - Choose the Hardware tab
    - Click the Device Manager button
  • Expand "Sound, video and game controllers"
  • Right click on the generic USB Audio Device, and choose Properties
  • Select the Driver tab
  • Click Update Driver
  • Choose "No, not at this time" to let Windows fix it and click Next
  • Choose "Install from a list or specific location" and click Next
  • Choose "Don't Search. I will choose the driver to install." and click Next
  • A) In the Model box, choose "Axiom 25 USB" Driver if it is available
  • B) Choose "Have Disk"
    - Choose Browse
    - Navigate to the location of the downloaded driver, i.e. C:\Program Files\M-Audio\M-Audio Series II MIDI
  • A second driver should attempt to update itself. Repeat the previous few steps for the "Axiom 25 USB MIDI Driver" as well.
This worked for me. The device appeared in all MIDI controlling software packages.

Thanks to rorschach76 @ http://forums.m-audio.com/showthread.php?t=334 for the method