Saturday, February 27, 2010

Loop Through Controls in VB


A little info about the tool to the left that I'm building then I'll get to the point:

This Attribution Assistant (screenshot of version 1) allows a user to quickly apply attribution to selected features in ArcMap.  Say you're attributing a huge dataset of streams (my current project) and they need to be designated either a "river," a "stream," or a "canal."  One can open an editing session and type in the values as they're hilighted, or for several at a time (a bit more efficient) a user can right click on the in the attribute table, and use the Field Calculator to do some en-masse attribution, but she or he will still need to change that one value over and over again.  Back and forth... Kill me.

Instead, select the layer of interest, then select the field that will hold the attribution, and add up to 16 text boxes for possible values (it starts with just one row, but the screenshot is expanded to 16 for the sake of screenshots...).  Then select some features and click the calculator button that corresponds with the proper value.  That's it.  One click attribution.

The check boxes to the right disables the corresponding text box and delete button so a user doesn't accidentally change/remove values.  Here's the problem though.  For version 2, there will be a "Check All" check box at the top that will let the user - that's right - select/unselect all check boxes at once.  The best way to do this is to loop through each check box control and set its value to False.

Easier example to begin:
  • All text boxes should be reset when the the dataset is changed or the form is "reset" for other possible reasons.
Originally, the Reset procedure/subroutine had 16 lines which manually erase each text box:

‘Reset all text boxes to null or  “”
txtValue01.Text = ""
txtValue02.Text = ""
txtValue03.Text = ""
txtValue04.Text = ""
txtValue05.Text = ""
txtValue06.Text = ""
txtValue07.Text = ""
txtValue08.Text = ""
txtValue09.Text = ""
txtValue10.Text = ""
txtValue11.Text = ""
txtValue12.Text = ""
txtValue13.Text = ""
txtValue14.Text = ""
txtValue15.Text = ""
txtValue16.Text = ""

This works, but it's lame.  Here's a better way, explained below:

‘This is faster
Dim cControl As Control
For Each cControl In Me.Controls
........'Look for text boxes only
........If TypeName(cControl) = "TextBox" Then
............cControl.Text = ""
....End If

Next cControl
[Be sure to remove the dots (....) used to format the above code]

- Start by creating an object named cControl (or whatever) As a Control.
- Make a For Each loop that will loop/search through all controls (buttons, text boxes, etc. see my VB Cheat Sheet) in the form.
- Begin to target which specific controls you want to change.  In this case all text boxes in the form should be changed, but if there were more text boxes, you can add more parameters to a query.  For instance, all text boxes with a certain .Tag or .Name.  Use logic operators (like And, Or, etc.) to add to the query.

A (just slightly) more difficult example:

I also want to set .Tabstop = False for some of the text boxes so a user can hit the tab key to move the cursor to the next available text box.  The problem is that I don't want the user to tab to a box that is out of view. (I cheated.  When the form initializes, there seems to be only one row of attribution controls, but there are 16.  The form just gets bigger and the next row of controls are initialized.  They're really there the whole time though.)

So there's some code to take care of turning the .Tabstop property on, but let's just focus on turning that off as well.  I'll also include another parameter in the query to find the exact controls, highlighted below:

‘Loop through controls
Dim cControl As Control
For Each cControl In Me.Controls
........'Look for specific text boxes
........If TypeName(cControl) = "TextBox" And _
............cControl.Name Like "txtValue*" Then
............cControl.Text = ""
............cControl.Tabstop = False
....End If
Next cControl
[Be sure to remove the dots (....) used to format the above code]


    Friday, February 19, 2010

    Gaps in Polyline Coverages / Vector Linear Direction

    I'm editing a large statewide line coverage of streams across the state of Florida based on 24k NHD Flowlines. I have been continually coming across what appear to be small gaps in the coverage, however zooming in (even to 1:1 or further) does not reveal disconnected features.  Setting snapping parameters and repositioning the endpoints in an editing session doesn't help either.

    Here's a screenshot with an enlargement of the gap to the left.  The instances of the gap are subtle, and even more so in screenshot below (click to enlarge):

    A gap between two segments in a polyline coverage with
    an enlargement of the issue to the left

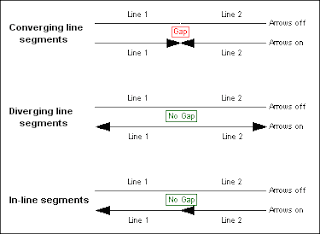
    It turns out that the line segments do in fact intersect and their ends are connected.  The problem is that the vector feature directions may not be aligned properly.  Although it is possible for two stream segments to flow away from each other (via confluence at usually obtuse angles), when the directions of two line segments are converging (see below) a small gap appears between the two features which is usually only one pixel wide.

    There's a bit more to the distance and direction parameters that polyline features preserve in a vector dataset. A tertiary "from-to" designation is included in the bearing, although it's not always apparent at first glance (nor is it always needed, though it's a good idea to consider to avoid future problems).

    Vector Linear Direction:

    As an illustration, two simple line segments are created.  Line 1 is digitized from west to east / left to right, and Line 2 is digitized from east to west, however it isn't immediately apparent:


    By viewing a line's vertices (double click on a line segment using the edit tool in an edit session to expose its sketch) one can view the from-to direction orientation of a line feature.  Initial / first, and intermediate vertices are green, and the final / last vertex is red; which indicate from-to direction:


    The from-to direction of a line can be flipped easily: select a line, expose its sketch (double click using the edit tool), then right click the sketch and choose Flip from the context menu.

    It's easier to visualize flow direction of a linear network by putting arrow heads on the end of each line:


    Arrowhead Symbology:
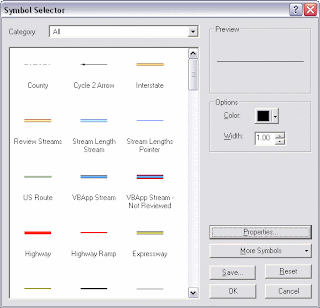
    • Open the "Symbol Selector" dialog for a line coverage (change the symbol properties):
     
    • Click Properties to open the Symbol Property Editor
    • Change the Type to "Catrographic Line Symbol"
    • Navigate to the Line Properties tab
    • Select the middle, right facing arrow from Line Decorations area and click OK until you're back at your map:

    The default symbology is a bit bulky so play around with different settings and characters to represent arrowheads or other symbols at either or both ends of your line features.

    Linear Network Interactions:

    So the single pixel-wide gap seems to appear only with converging line segments, and not with diverging, or in-line interactions:


    Sunday, February 7, 2010

    Challenges of February Album Writing Month


    February Album Writing Month is a challenge to write and record 14 songs in 28 days.  This is quite a feat in itself, however the collective of artists with whom I have joined live hundreds of miles apart!  The solution is a (so far) effective integration of web technology, project management, discussion, collaboration.  Somehow, we have found enough time to cram some creativity in there.

    Discussion and Collaboration:
    E-mail is the main form of communication however many of the members meet in a group chat session to discuss various topics ranging from media about material to management techniques.  These are assisted by the use of a private Google Group, which we use to group e-mail topics and discussions together, an also to store web pages to jot down notes, lyrics, and other information about songs, and other information.


    Project Management:
    The Google Group is a very important tool to keep ideas flowing together smoothly, however key bits of information can get easily lost in this massive amount of flowing thoughts; especially if a member misses a message, or cannot keep up to date with every discussion.  A more specific collaborative table of information was created using a Google Docs spreadsheet to track the process of individual songs that are in various stages of being created.  Take a look below:


    Web Technology:
    Many thanks are given to Google for providing such power and effective tools, however there's still more to this endeavor.  The nature of internet recording projects introduces a problem of sending content (numerous large .wav files).  We have been using a private FTP site to house the final cuts of each contributing part of a song to be mixed at the end of the month, however drop.io is used to post intermediate audio tracks (loops, samples, ideas, grooves, individual cuts, etc.) to quickly reference for writing and recording sessions:


    In addition, several members are posting thoughts and musings about the process in our blog: TheseGnarlyBeasts.tumblr.com.  As the recording for each song is completed, we intend to post minute-long raw mixdown samples here.  The final album will be released free of charge via bandcamp (also see TheseGnarlyBeasts.bandcamp.com):


    I have been streaming my recording sessions live on the web via justin.tv/justinberke.  Each time I start a session, I post a link to my friends via Twitter & Facebook, and justin.tv automatically posts a bulletin on MySpace.  This allows any of my friends, or other fellow Beasts to tune in and check out how each drum track or other portion of recording/mixing is progressing.

    These Gnarly Beasts draw upon a plethora of technological advancements to assist in making this daunting challenge possible.  A combined management effort from all members ensures that these various tools work effectively to facilitate a continuous flow of creativity and collaboration all month long.  Look for an additional link to the full album in the first week of March.